Contents
Earlier chapters in this book explained the benefits of building apps using the hypermedia architecture. These benefits were demonstrated by building a robust Contacts web application. Then, Chapter 11 argued that hypermedia concepts can and should be applied to platforms other than the web. We introduced Hyperview as an example of a hypermedia format and client specifically designed for building mobile apps. But you may still be wondering: what is it like to create a fully-featured, production-ready mobile app using Hyperview? Do we have to learn a whole new language and framework? In this chapter, we will show Hyperview in action by porting the Contacts web app to a native mobile app. You will see that many web development techniques (and indeed, much of the code) are completely identical when developing with Hyperview. How is that possible?
Our Contacts web app was built with the principle of HATEOAS (Hypermedia as the Engine of Application State). All of the app’s features (retrieving, searching, editing, and creating contacts) are implemented in the backend (the
ContactsPython class). Our mobile app, built with Hyperview, also leverages HATEOAS and relies on the backend for all of the app’s logic. That means theContactsPython class can power our mobile app the same way it powers the web app, without any changes required.The client-server communication in the web app happens using HTTP. The HTTP server for our web app is written using the Flask framework. Hyperview also uses HTTP for client-server communication. So we can re-use the Flask routes and views from the web app for the mobile app as well.
The web app uses HTML for its hypermedia format, and Hyperview uses HXML. HTML and HXML are different formats, but the base syntax is similar (nested tags with attributes). This means we can use the same templating library (Jinja) for HTML and HXML. Additionally, many of the concepts of htmx are built into HXML. We can directly port web app features implemented with htmx (search, infinite loading) to HXML.
Essentially, we can re-use almost everything from the web app backend, but we will need to replace the HTML templates with HXML templates. Most of the sections in this chapter will assume we have the web contacts app running locally and listening on port 5000. Ready? Let’s create new HXML templates for our mobile app’s UI.
Creating a mobile app
To get started with HXML, there’s one pesky requirement: the Hyperview client. When developing web applications, you only need to worry about the server because the client (web browser) is universally available. There’s no equivalent Hyperview client installed on every mobile device. Instead, we will create our own Hyperview client, customized to only talk to our server. This client can be packaged up into an Android or iOS mobile app, and distributed through the respective app stores.
Luckily, we don’t need to start from scratch to implement a Hyperview client. The Hyperview code repository comes with a demo backend and a demo client built using Expo. We will use this demo client but point it to our contacts app backend as a starting point.
git clone git@github.com:Instawork/hyperview.git
cd hyperview/demo
yarn <1>
yarn start <2>
Install dependencies for the demo app
Start the Expo server to run the mobile app in the iOS simulator.
After running yarn start, you will be presented with a
prompt asking you to open the mobile app using an Android emulator or
iOS simulator. Select an option based on which developer SDK you have
installed. (The screenshots in this chapter will be taken from the iOS
simulator.) With any luck, you will see the Expo mobile app installed in
the simulator. The mobile app will automatically launch and show a
screen saying “Network request failed.” That’s because by default, this
app is configured to make a request to http://0.0.0.0:8085/index.xml,
but our backend is listening on port 5000. To fix this, we can make a
simple configuration change in the demo/src/constants.js
file:
//export const ENTRY_POINT_URL = 'http://0.0.0.0:8085/index.xml'; <1>
export const ENTRY_POINT_URL = 'http://0.0.0.0:5000/'; <2>
The default entry point URL in the demo app
Setting the URL to point to our contacts app
We’re not up and running yet. With our Hyperview client now pointing to the right endpoint, we see a different error, a “ParseError.” That’s because the backend is responding to requests with HTML content, but the Hyperview client expects an XML response (specifically, HXML). So it’s time to turn our attention to our Flask backend. We will go through the Flask views, and replace the HTML templates with HXML templates. Specifically, let’s support the following features in our mobile app:
A searchable list of contacts
Viewing the details of a contact
Editing a contact
Deleting a contact
Adding a new contact
A Searchable List of Contacts
We will start building our Hyperview app with the entry point screen, the list of contacts. For the initial version of this screen, let’s support the following features from the web app:
display a scrollable list of contacts
“search-as-you-type” field above the list
“infinite-scroll” to load more contacts as the user scrolls through
Additionally, we will add a “pull-to-refresh” interaction on the list, since users expect this from list UIs in mobile apps.
If you recall, all of the pages in the Contacts web app extended a
common base template, layout.html. We need a similar base
template for the screens of the mobile app. This base template will
contain the style rules of our UI, and a basic structure common to all
screens. Let’s call it layout.xml.
<doc xmlns="https://hyperview.org/hyperview">
  <screen>
    <styles><!-- omitted for brevity --></styles>
    <body style="body" safe-area="true">
      <header style="header">
        {% block header %} <1>
          <text style="header-title">Contact.app</text>
        {% endblock %}
      </header>

      <view style="main">
        {% block content %}{% endblock %} <2>
      </view>
    </body>
  </screen>
</doc>
Base template hv/layout.xml
The header section of the template, with a default title.
The content section of the template, to be provided by other templates.
We’re using the HXML tags and attributes covered in the previous
chapter. This template sets up a basic screen layout using
<doc>, <screen>,
<body>, <header>, and
<view> tags. Note that the HXML syntax plays well
with the Jinja templating library. Here, we’re using Jinja’s blocks to
define two sections (header and content) that
will hold the unique content of a screen. With our base template
completed, we can create a template specifically for the contacts list
screen.
{% extends 'hv/layout.xml' %} <1>

{% block content %} <2>
  <form> <3>
    <text-field name="q" value="" placeholder="Search..."
      style="search-field" />
    <list id="contacts-list"> <4>
      {% include 'hv/rows.xml' %}
    </list>
  </form>
{% endblock %}
Start of hv/index.xml
Extend the base layout template
Override the
contentblock of the layout templateCreate a search form that will issue an HTTP
GETto/contactsThe list of contacts, using a Jinja
includetag.
This template extends the base layout.xml, and overrides
the content block with a <form>. At
first, it might seem strange that the form wraps both the
<text-field> and the <list>
elements. But remember: in Hyperview, the form data gets included in any
request originating from a child element. We will soon add interactions
to the list (pull to refresh) that will require the form data. Note the
use of a Jinja include tag to render the HXML for the rows
of contacts in the list (hv/rows.xml). Just like in the
HTML templates, we can use the include to break up our HXML
into smaller pieces. It also allows the server to respond with just the
rows.xml template for interactions like searching, infinite
scroll, and pull-to-refresh.
<items xmlns="https://hyperview.org/hyperview"> <1>
  {% for contact in contacts %} <2>
    <item key="{{ contact.id }}" style="contact-item"> <3>
      <text style="contact-item-label">
        {% if contact.first %}
          {{ contact.first }} {{ contact.last }}
        {% elif contact.phone %}
          {{ contact.phone }}
        {% elif contact.email %}
          {{ contact.email }}
        {% endif %}
      </text>
    </item>
  {% endfor %}
</items>
hv/rows.xml
An HXML element that groups a set of
<item>elements in a common ancestor.Iterate over the contacts that were passed in to the template.
Render an
<item>for each contact, showing the name, phone number, or email.
In the web app, each row in the list showed the contact’s name, phone number, and email address. But in a mobile app, we have less real-estate. It would be hard to cram all this information into one line. Instead, the row just shows the contact’s first and last name, and falls back to phone or email if the name is not set. To render the row, we again make use of Jinja template syntax to render dynamic text with data passed to the template.
We now have templates for the base layout, the contacts screen, and
the contact rows. But we still have to update the Flask views to use
these templates. Let’s take a look at the contacts() view
in its current form, written for the web app:
@app.route("/contacts")
def contacts():
    search = request.args.get("q")
    page = int(request.args.get("page", 1))
    if search:
        contacts_set = Contact.search(search)
        if request.headers.get('HX-Trigger') == 'search':
            return render_template("rows.html",
              contacts=contacts_set, page=page)
    else:
        contacts_set = Contact.all(page)
    return render_template("index.html",
      contacts=contacts_set, page=page)
app.py
This view supports fetching a set of contacts based on two query
params, q and page. It also decides whether to
render the full page (index.html) or just the contact rows
(rows.html) based on the HX-Trigger header.
This presents a minor problem. The HX-Trigger header is set
by the htmx library; there’s no equivalent feature in Hyperview.
Moreover, there are multiple scenarios in Hyperview that require us to
respond with just the contact rows:
searching
pull-to-refresh
loading the next page of contacts
Since we can’t depend on a header like HX-Trigger, we
need a different way to detect if the client needs the full screen or
just the rows in the response. We can do this by introducing a new query
param, rows_only. When this param has the value
true, the view will respond to the request by rendering the
rows.xml template. Otherwise, it will respond with the
index.xml template:
@app.route("/contacts")
def contacts():
    search = request.args.get("q")
    page = int(request.args.get("page", 1))
    rows_only = request.args.get("rows_only") == "true" <1>
    if search:
        contacts_set = Contact.search(search)
    else:
        contacts_set = Contact.all(page)

    template_name = "hv/rows.xml" if rows_only else "hv/index.xml" <1>
    return render_template(template_name,
      contacts=contacts_set, page=page)
app.py
Check for a new
rows_onlyquery param.Render the appropriate HXML template based on
rows_only.
There’s one more change we have to make. Flask assumes that most
views will respond with HTML. So Flask defaults the
Content-Type response header to a value of
text/html. But the Hyperview client expects to receive HXML
content, indicated by a Content-Type response header with
value application/vnd.hyperview+xml. The client will reject
responses with a different content type. To fix this, we need to
explicitly set the Content-Type response header in our
Flask views. We will do this by introducing a new helper function,
render_to_response():
def render_to_response(template_name, *args, **kwargs):
    content = render_template(template_name, *args, **kwargs) <1>
    response = make_response(content) <2>
    response.headers['Content-Type'] =
      'application/vnd.hyperview+xml' <3>
    return response
app.py
Renders the given template with the supplied arguments and keyword arguments.
Create an explicit response object with the rendered template.
Sets the response
Content-Typeheader to XML.
As you can see, this helper function uses
render_template() under the hood.
render_template() returns a string. This helper function
uses that string to create an explicit Response object. The
response object has a headers attribute, allowing us to set
and change the response headers. Specifically,
render_to_response() sets Content-Type to
application/vnd.hyperview+xml so that the Hyperview client
recognizes the content. This helper is a drop-in replacement for
render_template in our views. So all we need to do is
update the last line of the contacts() function.
return render_to_response(template_name,
  contacts=contacts_set, page=page) <1>
contacts() function
Render the HXML template to an XML response.
With these changes to the contacts() view, we can
finally see the fruits of our labor. After restarting the backend and
refreshing the screen in our mobile app, we can see the contacts
screen!
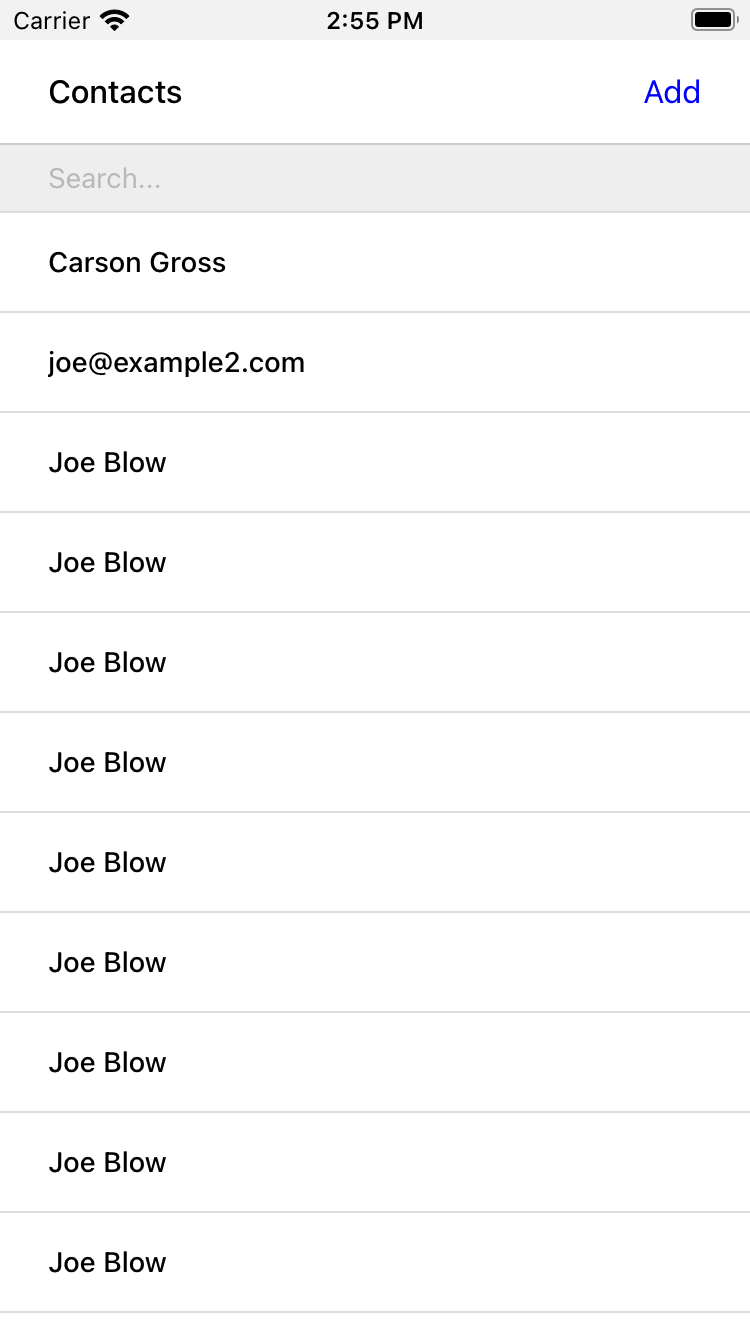
Contacts Screen
Searching Contacts
So far, we have a mobile app that displays a screen with a list of
contacts. But our UI doesn’t support any interactions. Typing a query in
the search field doesn’t filter the list of contacts. Let’s add a
behavior to the search field to implement a search-as-you-type
interaction. This requires expanding <text-field> to
add a <behavior> element.
<text-field name="q" value="" placeholder="Search..."
  style="search-field">
  <behavior
    trigger="change" <1>
    action="replace-inner" <2>
    target="contacts-list" <3>
    href="/contacts?rows_only=true" <4>
    verb="get" <5>
  />
</text-field>
Snippet of hv/index.xml
This behavior will trigger when the value of the text field changes.
When the behavior triggers, the action will replace the content inside the target element.
The target of the action is the element with ID
contacts-list.The replacement content will be fetched from this URL path.
The replacement content will be fetched with the
GETHTTP method.
The first thing you’ll notice is that we changed the text field from
using a self-closing tag (<text-field />) to using
opening and closing tags
(<text-field>…</text-field>). This allows us to
add a child <behavior> element to define an
interaction.
The trigger="change" attribute tells Hyperview that a
change to the value of the text field will trigger an action. Any time
the user edits the content of the text field by adding or deleting
characters, an action will trigger.
The remaining attributes on the <behavior> element
define the action. action="replace-inner" means the action
will update content on the screen, by replacing the HXML content of an
element with new content. For replace-inner to do its
thing, we need to know two things: the current element on the screen
that will be targeted by the action, and the content that will used for
the replacement. target="contacts-list" tells us the ID of
the current element. Note that we set id="contacts-list" on
the <list> element in index.xml. So when
the user enters a search query into the text field, Hyperview will
replace the content of <list> (a bunch of
<item> elements) with new content
(<item> elements that match the search query)
received in the relative href response. The domain here is inferred from
the domain used to fetch the screen. Note that href
includes our rows_only query param; we want the response to
only include the rows and not the entire screen.
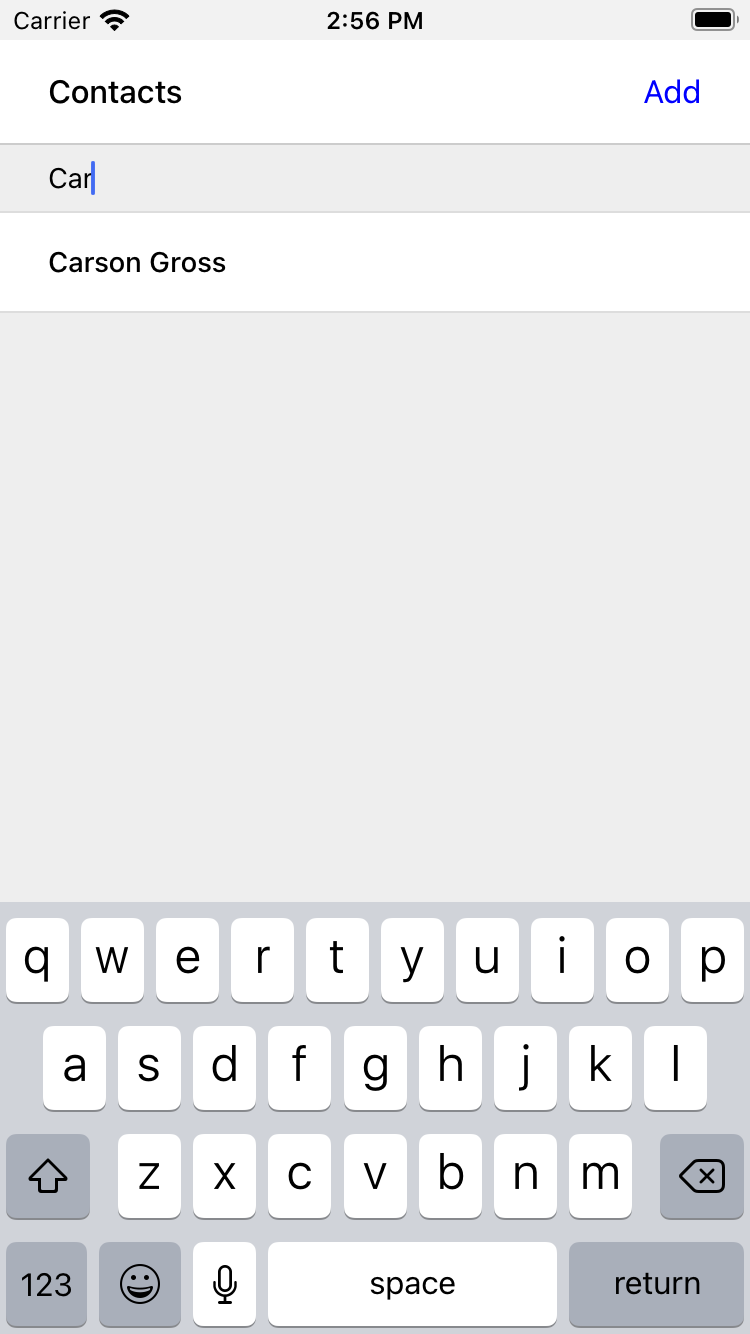
Searching for Contacts
That’s all it takes to add search-as-you-type functionality to our
mobile app! As the user types a search query, the client will make
requests to the backend and replace the list with the search results.
You may be wondering, how does the backend know the query to use? The
href attribute in the behavior does not include the
q param expected by our backend. But remember, in
index.xml, we wrapped the <text-field>
and <list> elements with a <form>
element. The <form> element defines a group of inputs
that will be serialized and included in any HTTP requests triggered by
its child elements. In this case, the <form> element
surrounds the search behavior and the text field. So the value of the
<text-field> will be included in our HTTP request for
the search results. Since we are making a GET request, the
name and value of the text field will be serialized as a query param.
Any existing query params on the href will be preserved.
This means the actual HTTP request to our backend looks like
GET /contacts?rows_only=true&q=Car. Our backend already
supports the q param for searching, so the response will
include rows that match the string “Car.”
Infinite scroll
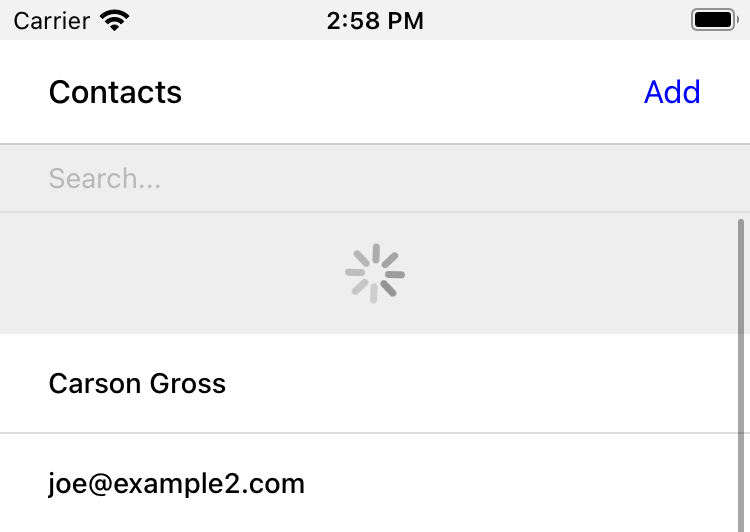
If the user has hundreds or thousands of contacts, loading them all at once may result in poor app performance. That’s why most mobile apps with long lists implement an interaction known as “infinite scroll.” The app loads a fixed number of initial items in the list, let’s say 100 items. If the user scrolls to the bottom of the list, they see a spinner indicating more content is loading. Once the content is available, the spinner is replaced with the next page of 100 items. These items are appended to the list, they don’t replace the first set of items. So the list now contains 200 items. If the user scrolls to the bottom of the list again, they will see another spinner, and the app will load the next set of content. Infinite scroll improves app performance in two ways:
The initial request for 100 items will be processed quickly, with predictable latency.
Subsequent requests can also be fast and predictable.
If the user doesn’t scroll to the bottom of the list, the app won’t have to make subsequent requests.
Our Flask backend already supports pagination on the
/contacts endpoint via the page query param.
We just need to modify our HXML templates to make use of this parameter.
To do this, let’s edit rows.xml to add a new
<item> below the Jinja for-loop:
<items xmlns="https://hyperview.org/hyperview">
  {% for contact in contacts %}
    <item key="{{ contact.id }}" style="contact-item">
      <!-- omitted for brevity -->
    </item>
  {% endfor %}
  {% if contacts|length > 0 %}
    <item key="load-more" id="load-more" style="load-more-item"> <1>
      <behavior
        trigger="visible" <2>
        action="replace" <3>
        target="load-more" <4>
        href="/contacts?rows_only=true&page={{ page + 1 }}" <5>
        verb="get"
      />
      <spinner /> <6>
    </item>
  {% endif %}
</items>
Snippet of hv/rows.xml
Include an extra
<item>in the list to show the spinner.The item behavior triggers when visible in the viewport.
When triggered, the behavior will replace an element on the screen.
The element to be replaced is the item itself (ID
load-more).Replace the item with the next page of content.
The spinner element.
If the current list of contacts passed to the template is empty, we
can assume there’s no more contacts to fetch from the backend. So we use
a Jinja conditional to only include this new <item>
if the list of contacts is non-empty. This new <item>
element gets an ID and a behavior. The behavior defines the infinite
scroll interaction.
Up until now, we’ve seen trigger values of
change and refresh. But to implement infinite
scroll, we need a way to trigger the action when the user scrolls to the
bottom of the list. The visible trigger can be used for
this exact purpose. It will trigger the action when the element with the
behavior is visible in the device viewport. In this case, the new
<item> element is the last item in the list, so the
action will trigger when the user scrolls down far enough for the item
to enter the viewport. As soon as the item is visible, the action will
make an HTTP GET request, and replace the loading
<item> element with the response content.
Note that our href must include the rows_only=true query
param, so that our response will only include HXML for the contact
items, and not the entire screen. Also, we’re passing the
page query param, incrementing the current page number to
ensure we load the next page.
What happens when there’s more than one page of items? The initial
screen will include the first 100 items, plus the “load-more” item at
the bottom. When the user scrolls to the bottom of the screen, Hyperview
will request the second page of items (&page=2), and
replace the “load-more” item with the new items. But this second page of
items will include a new “load-more” item. So once the user scrolls
through all of the items from the second page, Hyperview will again
request more items (&page=3). And once again, the
“load-more” item will be replaced with the new items. This will continue
until all of the items will be loaded on the screen. At that point,
there will be no more contacts to return, the response will not include
another “load-more” item, and our pagination is over.
Pull-to-refresh
Pull-to-refresh is a common interaction in mobile apps, especially on screens featuring dynamic content. It works like this: At the top of a scrolling view, the user pulls the scrolling content downwards with a swipe-down gesture. This reveals a spinner “below” the content. Pulling the content down sufficiently far will trigger a refresh. While the content refreshes, the spinner remains visible on screen, indicating to the user that the action is still taking place. Once the content is refreshed, the content retracts back up to its default position, hiding the spinner and letting the user know that the interaction is done.
Pull-to-refresh
This pattern is so common and useful that it’s built in to Hyperview
via the refresh action. Let’s add pull-to-refresh to our
list of contacts to see it in action.
<list id="contacts-list"
  trigger="refresh" <1>
  action="replace-inner" <2>
  target="contacts-list" <3>
  href="/contacts?rows_only=true" <4>
  verb="get" <5>
>
  {% include 'hv/rows.xml' %}
</list>
Snippet of hv/index.xml
This behavior will trigger when the user does a “pull-to-refresh” gesture.
When the behavior triggers, this action will replace the content inside the target element.
The target of the action is the
<list>element itself.The replacement content will be fetched from this URL path.
The replacement content will be fetched with the
GETHTTP method.
You’ll notice something unusual in the snippet above: rather than
adding a <behavior> element to the
<list>, we added the behavior attributes directly to
the <list> element. This is a shorthand notation
that’s sometimes useful for specifying single behaviors on an element.
It is equivalent to adding a <behavior> element to
the <list> with the same attributes.
So why did we use the shorthand syntax here? It has to do with the
action, replace-inner. Remember, this action replaces all
child elements of the target with the new content. This includes
<behavior> elements too! Let’s say our
<list> did contain a <behavior>.
If the user did a search or pull-to-refresh, we would replace the
content of <list> with the content from
rows.xml. The <behavior> would no longer
be defined on the <list>, and subsequent attempts to
pull-to-refresh would not work. By defining the behavior as attributes
of <list>, the behavior will persist even when
replacing the items in the list. Generally, we prefer to use explicit
<behavior> elements in HXML. It makes it easier to
define multiple behaviors, and to move the behavior around while
refactoring. But the shorthand syntax is good to apply in situations
like this.
Viewing The Details Of A Contact
Now that our contacts list screen is in good shape, we can start
adding other screens to our app. The natural next step is to create a
details screen, which appears when the user taps an item in the contacts
list. Let’s update the template that renders the contact
<item> elements, and add a behavior to show the
details screen.
<items xmlns="https://hyperview.org/hyperview">
  {% for contact in contacts %}
    <item key="{{ contact.id }}" style="contact-item">
      <behavior trigger="press" action="push"
        href="/contacts/{{ contact.id }}" /> <1>
      <text style="contact-item-label">
        <!-- omitted for brevity -->
      </text>
    </item>
  {% endfor %}
</items>
hv/rows.xml
Behavior to push the contact details screen onto the stack when pressed.
Our Flask backend already has a route for serving the contact details
at /contacts/<contact_id>. In our template, we use a
Jinja variable to dynamically generate the URL path for the current
contact in the for-loop. We also used the “push” action to show the
details by pushing a new screen onto the stack. If you reload the app,
you can now tap any contact in the list, and Hyperview will open the new
screen. However, the new screen will show an error message. That’s
because our backend is still returning HTML in the response, and the
Hyperview client expects HXML. Let’s update the backend to respond with
HXML and the proper headers.
@app.route("/contacts/<contact_id>")
def contacts_view(contact_id=0):
    contact = Contact.find(contact_id)
    return render_to_response("hv/show.xml", contact=contact) <1>
app.py
Generate an XML response from a new template file.
Just like the contacts() view,
contacts_view() uses render_to_response() to
set the Content-Type header on the response. We’re also
generating the response from a new HXML template, which we can create
now:
{% extends 'hv/layout.xml' %} <1>

{% block header %} <2>
  <text style="header-button">
    <behavior trigger="press" action="back" /> <3>
    Back
  </text>
{% endblock %}

{% block content %} <4>
<view style="details">
  <text style="contact-name">
    {{ contact.first }} {{ contact.last }}
  </text>

  <view style="contact-section">
    <text style="contact-section-label">Phone</text>
    <text style="contact-section-info">{{contact.phone}}</text>
  </view>

  <view style="contact-section">
    <text style="contact-section-label">Email</text>
    <text style="contact-section-info">{{contact.email}}</text>
  </view>
</view>
{% endblock %}
hv/show.xml
Extend the base layout template.
Override the
headerblock of the layout template to include a “Back” button.Behavior to navigate to the previous screen when pressed.
Override the
contentblock to show the full details of the selected contact.
The contacts detail screen extends the base layout.xml
template, just like we did in index.xml. This time, we’re
overriding content in both the header block and
content block. Overriding the header block lets us add a
“Back” button with a behavior. When pressed, the Hyperview client will
unwind the navigation stack and return the user to the contacts
list.
Note that triggering this behavior is not the only way to navigate back. The Hyperview client respects navigation conventions on different platforms. On iOS, users can also navigate to the previous screen by swiping right from the left edge of the device. On Android, users can also navigate to the previous screen by pressing the hardware back button. We don’t need to specify anything extra in the HXML to get these interactions.

Contact Details Screen
With just a few simple changes, we’ve gone from a single-screen app
to a multi-screen app. Note that we didn’t need to change anything in
the actual mobile app code to support our new screen. This is a big
deal. In traditional mobile app development, adding screens can be a
significant task. Developers need to create the new screen, insert it
into the appropriate place of the navigation hierarchy, and write code
to open the new screen from existing screens. In Hyperview, we just
added a behavior with action="push".
Editing a Contact
So far, our app lets us browse a list of contacts, and view details of a specific contact. Wouldn’t it be nice to update the name, phone number, or email of a contact? Let’s add UI to edit contacts as our next enhancement.
First we have to figure out how we want to display the editing UI. We
could push a new editing screen onto the stack, the same way we pushed
the contact details screen. But that’s not the best design from a
user-experience perspective. Pushing new screens makes sense when
drilling down into data, like going from a list to a single item. But
editing is not a “drill-down” interaction, it’s a mode switch between
viewing and editing. So instead of pushing a new screen, let’s replace
the current screen with the editing UI. That means we need to add a
button and behavior that use the reload action. This button
can be added to the header of the contact details screen.
{% block header %}
  <text style="header-button">
    <behavior trigger="press" action="back" />
    Back
  </text>

  <text style="header-button"> <1>
    <behavior trigger="press" action="reload"
      href="/contacts/{{contact.id}}/edit" /> <2>
    Edit
  </text>
{% endblock %}
Snippet of hv/show.xml
The new “Edit” button.
Behavior to reload the current screen with the edit screen when pressed.
Once again, we’re reusing an existing Flask route
(/contacts/<contact_id>/edit) for the edit UI, and
filling in the contact ID using data passed to the Jinja template. We
also need to update the contacts_edit_get() view to return
an XML response based on an HXML template (hv/edit.xml).
We’ll skip the code sample because the needed changes are identical to
what we applied to contacts_view() in the previous section.
Instead, let’s focus on the template for the edit screen.
{% extends 'hv/layout.xml' %}

{% block header %}
  <text style="header-button">
    <behavior trigger="press" action="back" href="#" />
    Back
  </text>
{% endblock %}

{% block content %}
<form> <1>
  <view id="form-fields"> <2>
    {% include 'hv/form_fields.xml' %} <3>
  </view>

  <view style="button"> <4>
    <behavior
      trigger="press"
      action="replace-inner"
      target="form-fields"
      href="/contacts/{{contact.id}}/edit"
      verb="post"
    />
    <text style="button-label">Save</text>
  </view>
</form>
{% endblock %}
hv/edit.xml
Form wrapping the input fields and buttons.
Container with ID, containing the input fields.
Template include to render the input fields.
Button to submit the form data and update the input fields container.
Since the edit screen needs to send data to the backend, we wrap the
entire content section in a <form> element. This
ensures the form field data will be included in the HTTP requests to our
backend. Within the <form> element, our UI is divided
into two sections: the form fields, and the Save button. The actual form
fields are defined in a separate template (form_fields.xml)
and added to the edit screen using a Jinja include tag.
<view style="edit-group">
  <view style="edit-field">
    <text-field name="first_name" placeholder="First name"
      value="{{ contact.first }}" /> <1>
    <text style="edit-field-error">{{ contact.errors.first }}</text> <2>
  </view>

  <view style="edit-field"> <3>
    <text-field name="last_name" placeholder="Last name"
      value="{{ contact.last }}" />
    <text style="edit-field-error">{{ contact.errors.last }}</text>
  </view>

  <!-- same markup for contact.email and contact.phone -->
</view>
hv/form_fields.xml
Text input holding the current value for the contact’s first name.
Text element that could display errors from the contact model.
Another text field, this time for the contact’s last name.
We omitted the code for the contact’s phone number and email address,
because they follow the same pattern as the first and last name. Each
contact field has its own <text-field>, and a
<text> element below it to display possible errors.
The <text-field> has two important attributes:
namedefines the name to use when serializing the text-field’s value into form data for HTTP requests. We are using the same names as the web app from previous chapters (first_name,last_name,phone,email). That way, we don’t need to make changes in our backend to parse the form data.valuedefines the pre-filled data in the text field. Since we are editing an existing contact, it makes sense to pre-fill the text field with the current name, phone, or email.
You might be wondering, why did we choose to define the form fields
in a separate template (form_fields.xml)? To understand
that decision, we need to first discuss the “Save” button. When pressed,
the Hyperview client will make an HTTP POST request to
contacts/<contact_id>/edit, with form data serialized
from the <text-field> inputs. The HXML response will
replace the contents of form field container (ID
form-fields). But what should that response be? That
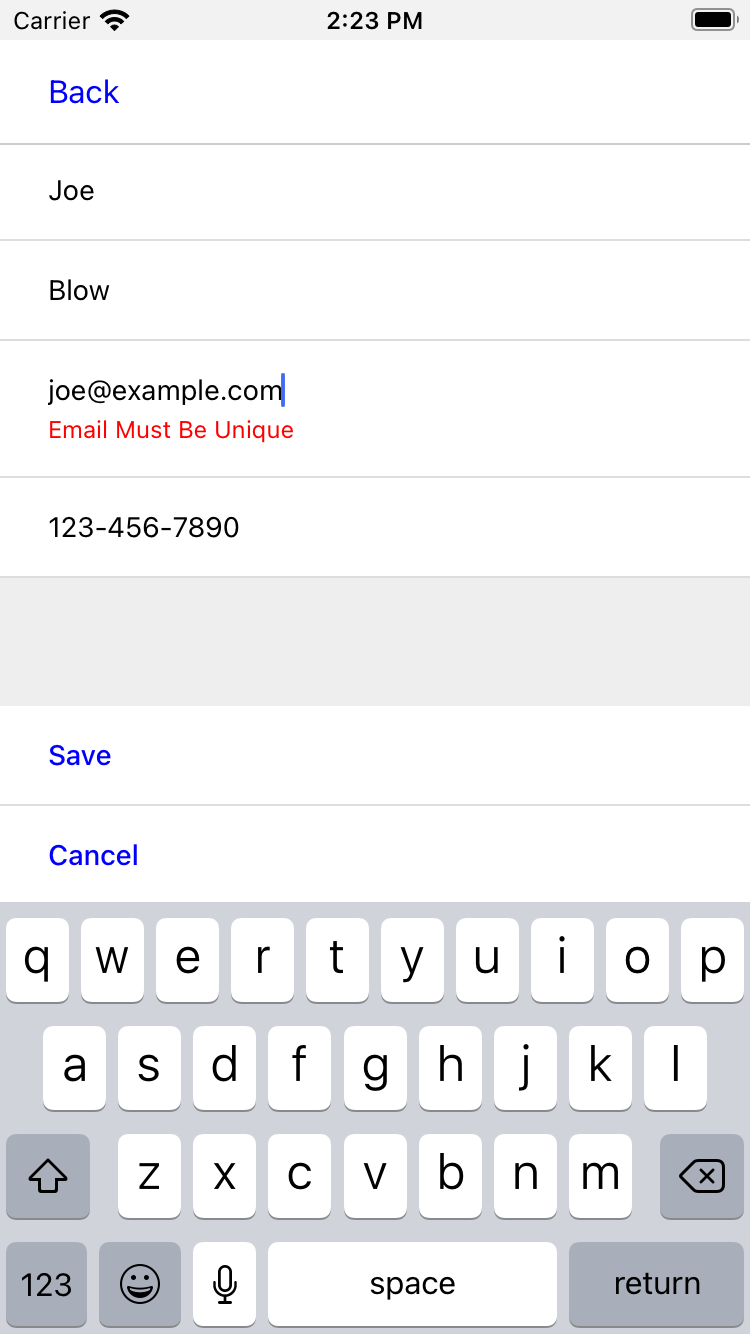
depends on the validity of the form data:
If the data is invalid (e.g., duplicate email address), our UI will remain in the editing mode and show error messages on the invalid fields. This allows the user to correct the errors and try saving again.
If the data is valid, our backend will persist the edits, and our UI will switch back to a display mode (the contact details UI).
So our backend needs to distinguish between a valid and invalid edit.
To support these two scenarios, let’s make some changes to the existing
contacts_edit_post() view in the Flask app.
@app.route("/contacts/<contact_id>/edit", methods=["POST"])
def contacts_edit_post(contact_id=0):
    c = Contact.find(contact_id)
    c.update(
      request.form['first_name'],
      request.form['last_name'],
      request.form['phone'],
      request.form['email']) <1>
    if c.save(): <2>
        flash("Updated Contact!")
        return render_to_response("hv/form_fields.xml",
          contact=c, saved=True) <3>
    else:
        return render_to_response("hv/form_fields.xml", contact=c) <4>
app.py
Update the contact object from the request’s form data.
Attempt to persist the updates. This returns
Falsefor invalid data.On success, render the form fields template, and pass a
savedflag to the templateOn failure, render the form fields template. Error messages are present on the contact object.
This view already contains conditional logic based on whether the
contact model save() succeeds. If save()
fails, we render the form_fields.xml template.
contact.errors will contain error messages for the invalid
fields, which will be rendered into the
<text style="edit-field-error"> elements. If
save() succeeds, we will also render the
form_fields.xml template. But this time, the template will
get a saved flag, indicating success. We will update the
template to use this flag to implement our desired UI: switching the UI
back to display mode.
<view style="edit-group">
  {% if saved %} <1>
    <behavior
      trigger="load" <2>
      action="reload" <3>
      href="/contacts/{{contact.id}}" <4>
    />
  {% endif %}

  <view style="edit-field">
    <text-field name="first_name" placeholder="First name"
      value="{{ contact.first }}" />
    <text style="edit-field-error">{{ contact.errors.first }}</text>
  </view>

  <!-- same markup for the other fields -->
</view>
hv/form_fields.xml
Only include this behavior after successfully saving a contact.
Trigger the behavior immediately.
The behavior will reload the entire screen.
The screen will be reloaded with the contact details screen.
The Jinja template conditional ensures that our behavior only renders
on successful saves, and not when the screen first opens (or the user
submits invalid data). On success, the template includes a behavior that
triggers immediately thanks to trigger="load". The action
reloads the current screen with the Contact Details screen (from the
/contacts/<contact_id> route).
The result? When the user hits “Save”, our backend persists the new contact data, and the screen switches back to the Details screen. Since the app will make a new HTTP request to get the contact details, it’s guaranteed to show the freshly saved edits.
We now have a working Edit UI in our contacts app. Users can enter the Edit mode by pressing a button on the contact details screen. In the Edit mode, they can update the contact’s data and save it to the backend. If the backend rejects the edits as invalid, the app stays in Edit mode and shows the validation errors. If the backend accepts and persists the edits, the app will switch back to the details mode, showing the updated contact data.
Let’s add one more enhancement to the Edit UI. It would be nice to let the user switch away from the Edit mode without needing to save the contact. This is typically done by providing a “Cancel” action. We can add this as a new button below the “Save” button.
<view style="button">
  <behavior trigger="press" action="replace-inner"target="form-fields"
    href="/contacts/{{contact.id}}/edit" verb="post" />
  <text style="button-label">Save</text>
</view>
<view style="button"> <1>
  <behavior
    trigger="press"
    action="reload" <2>
    href="/contacts/{{contact.id}}" <3>
  />
  <text style="button-label">Cancel</text>
</view>
Snippet of hv/edit.xml
A new Cancel button on the edit screen.
When pressed, reload the entire screen.
The screen will be reloaded with the contact details screen.
This is the same technique we used to switch from the edit UI to the
details UI upon successfully editing the contact. But pressing “Cancel”
will update the UI faster than pressing “Save.” On save, the app will
first make a POST request to save the data, and then a
GET request for the details screen. Cancelling skips the
POST, and immediately makes the GET
request.
Contact Edit Screen
Updating the Contacts List
At this point, we can claim to have fully implemented the Edit UI. But there’s a problem. In fact, if we stopped here, users may even consider the app to be buggy! Why? It has to do with syncing the app state across multiple screens. Let’s walk through this series of interactions:
Launch the app to the Contacts List.
Press on the contact “Joe Blow” to load his Contact Details.
Press Edit to switch to the edit mode, and change the contact’s first name to “Joseph.”
Press Save to switch back to viewing mode. The contact’s name is now “Joseph Blow.”
Hit the back button to return to the Contacts List.
Did you catch the issue? Our Contacts list is still showing the same list of names as when we launched the app. The contact we just renamed to “Joseph” is still showing up in the list as “Joe.” This is a general problem in hypermedia applications. The client does not have a notion of shared data across different parts of the UI. Updates in one part of the app will not automatically update other parts of the app.
Luckily, there’s a solution to this problem in Hyperview: events. Events are built into the behavior system, and allow lightweight communication between different parts of the UI.
We now know enough about Hyperview’s event system to solve the bug in
our app. When the user saves a change to a contact, we need to dispatch
an event from the Details screen. And the Contacts screen needs to
listen to that event, and reload itself to reflect the edits. Since the
form_fields.xml template already gets the
saved flag when the backend successfully saves a contact,
it’s a good place to dispatch the event:
{% if saved %}
  <behavior
    trigger="load" <1>
    action="dispatch-event" <2>
    event-name="contact-updated" <2>
  />
  <behavior <4>
    trigger="load"
    action="reload"
    href="/contacts/{{contact.id}}"
  />
{% endif %}
Snippet from
hv/form_fields.xml
Trigger the behavior immediately.
The behavior will dispatch an event.
The event name is “contact-updated”.
The existing behavior to show the Details UI.
Now, we just need the contacts list to listen for the
contact-updated event, and reload itself:
<form>
  <behavior
    trigger="on-event" <1>
    event-name="contact-updated" <2>
    action="replace-inner" <3>
    target="contacts-list"
    href="/contacts?rows_only=true"
    verb="get"
  />
  <!-- text-field omitted -->
  <list id="contacts-list">
    {% include 'hv/rows.xml' %}
  </list>
</form>
Snippet from hv/index.xml
Trigger the behavior on event dispatch.
Trigger the behavior for dispatched events with the name “contact-updated”.
When triggered, replace the contents of the
<list>element with rows from the backend.
Any time the user edits a contact, the Contacts List screen will
update to reflect the edits. The addition of these two
<behavior> elements fixes the bug: the Contacts List
screen will correctly show “Joseph Blow” in the list. Note that we
intentionally added the new behavior inside the
<form> element. The ensures the triggered request
will preserve any search query.
To show what we mean, let’s revisit the set of steps that
demonstrated the buggy behavior. Assume that before pressing on “Joe
Blow,” the user had searched the contacts by typing “Joe” in the search
field. When the user later updates the contact to “Joseph Blow”, our
template dispatches the “contact-updated” event, which triggers the
replace-inner behavior on the contact list screen. Due to
the <form> element, the search query “Joe” will be
serialized with the request:
GET /contacts?rows_only=true&q=Joe. Since the name
“Joseph” doesn’t match the query “Joe”, the contact we edited will not
appear in the list (until the user clears out the query). Our app’s
state remains consistent across our backend and all active screens.
Events introduce a level of abstraction to behaviors. So far, we’ve
seen that editing a contact will cause the list of contacts to refresh.
But the list of contacts should also refresh after other actions, such
as deleting a contact or adding a new contact. As long as our HXML
responses for deletion or creation include a behavior to dispatch a
contact-updated event, then we will get the desired refresh
behavior on the contacts list screen.
The screen doesn’t care what causes the contact-updated
event to be dispatched. It just knows what it needs to do when it
happens.
Deleting a Contact
Speaking of deleting a contact, this is a good next feature to
implement. We will let users delete a contact from the Edit UI. So let’s
add a new button to edit.xml.
<view style="button">
  <behavior trigger="press" action="replace-inner" target="form-fields"
    href="/contacts/{{contact.id}}/edit" verb="post" />
  <text style="button-label">Save</text>
</view>
<view style="button">
  <behavior trigger="press" action="reload"
    href="/contacts/{{contact.id}}" />
  <text style="button-label">Cancel</text>
</view>
<view style="button"> <1>
  <behavior
    trigger="press"
    action="append" <2>
    target="form-fields"
    href="/contacts/{{contact.id}}/delete" <3>
    verb="post"
  />
  <text style="button-label button-label-delete">Delete Contact</text>
</view>
Snippet of hv/edit.xml
New Delete Contact button on the edit screen.
When pressed, append HXML to a container on the screen.
The HXML will be fetched by making a
POST /contacts/<contact_id>/deleterequest.
The HXML for the Delete button is pretty similar to the Save button,
but there are a few subtle differences. Remember, pressing the Save
button results in one of two expected outcomes: failing and showing
validation errors on the form, or succeeding and switching to the
contact details screen. To support the first outcome (failing and
showing validation errors), the save behavior replaces the contents of
the <view id="form-fields"> container with a
re-rendered version of form_fields.xml. Therefore, using
the replace-inner action makes sense.
Deletion does not involve a validation step, so there’s only one
expected outcome: successfully deleting the contact. When deletion
succeeds, the contact no longer exists. It doesn’t make sense to show
the edit UI or contact details for a non-existent contact. Instead, our
app will navigate back to the previous screen (the contacts list). Our
response will only include behaviors that trigger immediately, there’s
no UI to change. Therefore, using the append action will
preserve the current UI while Hyperview runs the actions.
<view>
  <behavior trigger="load" action="dispatch-event"
    event-name="contact-updated" /> <1>
  <behavior trigger="load" action="back" /> <2>
</view>
Snippet of hv/deleted.xml
On load, dispatch the
contact-updatedevent to update the contact lists screen.Navigate back to the contacts list screen.
Note that in addition to behavior to navigate back, this template
also includes a behavior to dispatch the contact-updated
event. In the previous chapter section, we added a behavior to
index.xml to refresh the list when that event is
dispatched. By dispatching the event after a deletion, we will make sure
the deleted contact gets removed from the list.
Once again, we’ll skip over the changes to the Flask backend. Suffice
it to say, we will need to update the contacts_delete()
view to respond with the hv/deleted.xml template. And we
need to update the route to support POST in addition to
DELETE, since the Hyperview client only understands
GET and POST.
We now have a fully functioning deletion feature! But it’s not the most user-friendly: it takes one accidental tap to permanently delete a contact. For destructive actions like deleting a contact, it’s always a good idea to ask the user for confirmation.
We can add a confirmation to the delete behavior by using the
alert system action described in the previous chapter. As
you recall, the alert action will show a system dialog box
with buttons that can trigger other behaviors. All we have to do is wrap
the delete <behavior> in a behavior that uses
action="alert".
<view style="button">
  <behavior <1>
    xmlns:alert="https://hyperview.org/hyperview-alert"
    trigger="press"
    action="alert"
    alert:title="Confirm delete"
    alert:message="Are you sure you want to delete {{ contact.first }}?"
  >
    <alert:option alert:label="Confirm"> <2>
      <behavior <3>
        trigger="press"
        action="append"
        target="form-fields"
        href="/contacts/{{contact.id}}/delete"
        verb="post"
      />
    </alert:option>
    <alert:option alert:label="Cancel" /> <4>
  </behavior>
  <text style="button-label button-label-delete">Delete Contact</text>
</view>
Delete button in
hv/edit.xml
Pressing “Delete” triggers an action to show the system dialog with the given title and message.
The first pressable option in the system dialog.
Pressing the first option will trigger contact deletion.
The second pressable option has no behavior, so it only closes the dialog.
Unlike before, pressing the delete button will not have an immediate effect. Instead, the user will be presented with the dialog box and asked to confirm or cancel. Our core deletion behavior didn’t change, we just chained it from another behavior.
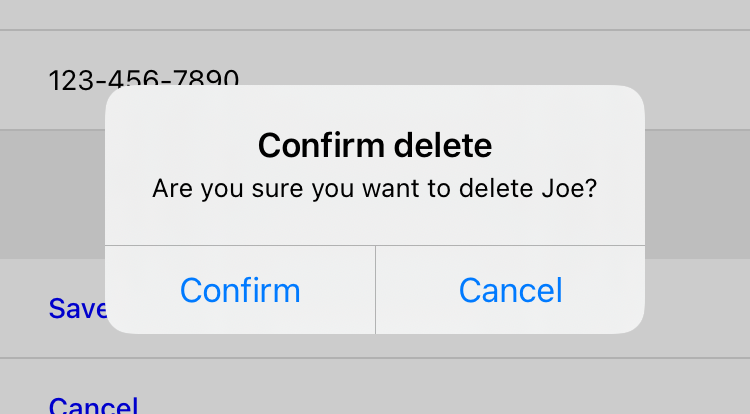
Delete Contact confirmation
Adding a New Contact
Adding a new contact is the last feature we want to support in our mobile app. And luckily, it’s also the easiest. We can reuse the concepts (and even some templates) from features we’ve already implemented. In particular, adding a new contact is very similar to editing an existing contact. Both features need to:
Show a form to collect information about the contact.
Have a way to save the entered information.
Show validation errors on the form.
Persist the contact when there are no validation errors.
Since the functionality is so similar, we’ll summarize the changes here without showing the code.
Update
index.xml.Override the
headerblock to add a new “Add” button.Include a behavior in the button. When pressed, push a new screen as a modal by using
action="new", and request the screen content from/contacts/new.
Create a template
hv/new.xml.Override the header block to include a button that closes the modal, using
action="close".Include the
hv/form_fields.xmltemplate to render empty form fieldsAdd a “Add Contact” button below the form fields.
Include a behavior in the button. When pressed, make a
POSTrequest to/contacts/new, and useaction="replace-inner"to update the form fields.
Update the Flask view.
Change
contacts_new_get()to userender_to_response()with thehv/new.xmltemplate.Change
contacts_new()to userender_to_response()with thehv/form_fields.xmltemplate. Passsaved=Truewhen rendering the template after successfully persisting the new contact.
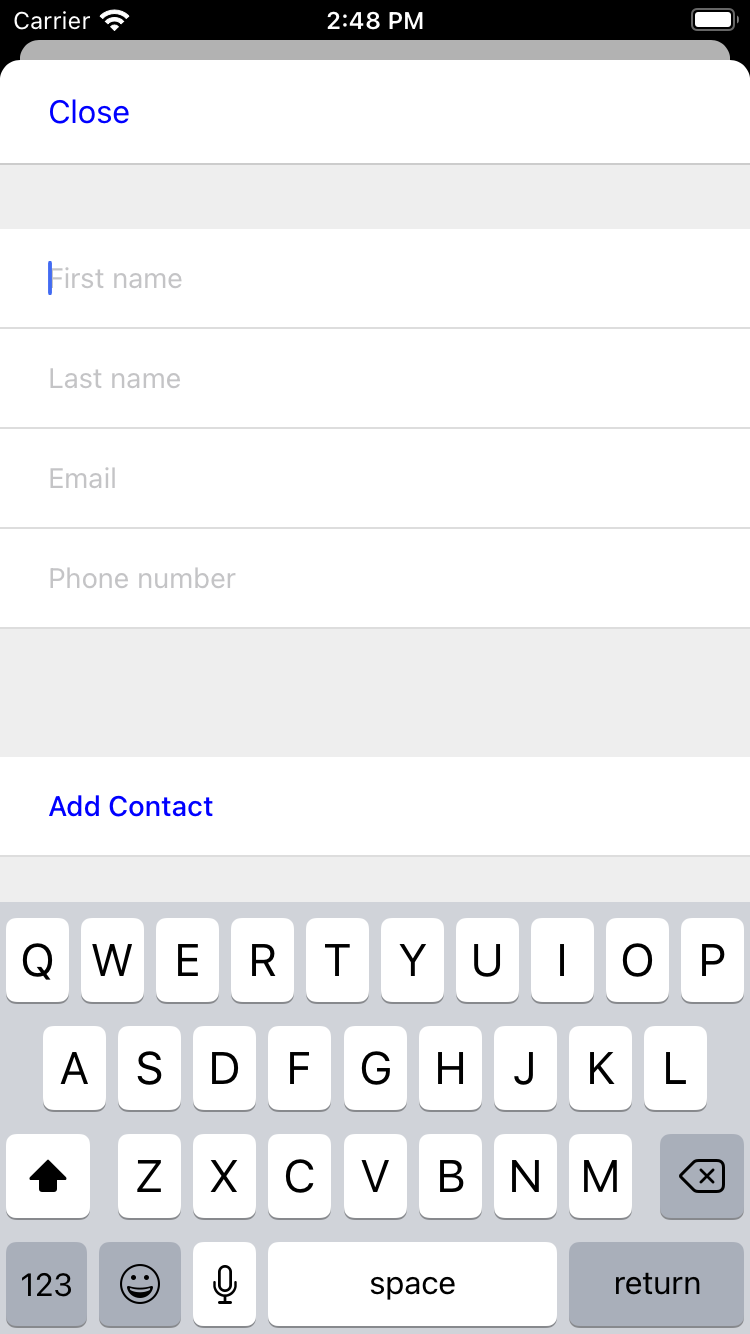
Add Contact modal
By reusing form_fields.xml for both editing and adding a
contact, we get to reuse some code and ensure the two features have a
consistent UI. Also, our “Add Contact” screen will benefit from the
“saved” logic that’s already a part of form_fields.xml.
After successfully adding a new contact, the screen will dispatch the
contact-updated event, which will refresh the contacts list
and show the newly added contact. The screen will reload itself to show
the Contact Details.
Deploying the App
With the completion of the contact creation UI, we have a fully implemented mobile app. It supports searching a list of contacts, viewing the details of a contact, editing and deleting a contact, and adding a new contact. But so far, we’ve been developing the app using a simulator on our desktop computer. How can we see it running on a mobile device? And how can we get it into the hands of our users?
To see the app running on a physical device, let’s take advantage of the Expo platform’s app preview functionality.
Download the Expo Go app on an Android or iOS device.
Restart the Flask app, binding to an interface accessible on your network. This might look something like
flask run --host 192.168.7.229, where the host is your computer’s IP address on the network.Update the Hyperview client code so that
ENTRY_POINT_URL(indemo/src/constants.js) points to the IP and port that the Flask server is bound to.After running
yarn startin the Hyperview demo app, you will see a QR code printed in the console, with instructions on how to scan it on Android and iOS.
Once you scan the QR code, the full app will run on the device. As you interact with the app, you will see HTTP requests made to the Flask server. You can even use the physical device during development. Any time you make a change in the HXML, just reload the screen to see the UI updates.
So we have the app running on a physical device, but it’s still not production ready. To get the app into the hands of our users, there’s a few things we need to do:
Deploy our backend in production. We need to use a production-grade web server like Gunicorn instead of the Flask development server. And we should run our app on a machine reachable on the Internet, most likely using a cloud provider like AWS or Heroku.
Create standalone binary apps. By following the instructions from the Expo project, we can create a
.ipaor.apkfile, for the iOS and Android platforms. Remember to updateENTRY_POINT_URLin the Hyperview client to point to the production backend.Submit our binaries to the iOS App Store or Google Play Store, and wait for app approval.
Once the app is approved, congratulations! Our mobile app can be downloaded by Android and iOS users. And here’s the best part: Because our app uses the hypermedia architecture, we can add features to our app by simply updating the backend. The UI and interactions are completely specified with the HXML generated from server-side templates. Want to add a new section to a screen? Just update an existing HXML template. Want to add a new type of screen to the app? Create a new route, view, and HXML template. Then, add a behavior to an existing screen that will open the new screen. To push these changes to your users, you just need to re-deploy the backend. Our app knows how to interpret HXML, and that’s enough for it to understand how to handle the new features.
One Backend, Multiple Hypermedia formats
To create a mobile app using the hypermedia architecture, we started
with the web-based contacts app and made a few changes, primarily
replacing HTML templates with HXML templates. But in the process of
porting the backend to serve our mobile app, we lost the web application
functionality. Indeed, if you tried to visit
http://0.0.0.0:5000 in a web browser, you would see a
jumble of text and XML markup. That’s because web browsers don’t know
how to render plain XML, and they certainly don’t know how to interpret
the tags and attributes of HXML to render an app. It’s a shame, because
the Flask code for the web application and mobile app are nearly
identical. The database and model logic are shared, and most of the
views are unchanged as well.
At this point you’re surely wondering: is it possible to use the same backend to serve both a web application and mobile app? The answer is yes! In fact, this is one of the benefits of using a hypermedia architecture across multiple platforms. We don’t need to port any client-side logic from one platform to another, we just need to respond to requests with the appropriate Hypermedia format. To do this, we will utilize content negotiation built into HTTP.
What is Content Negotiation?
Imagine a German speaker and Japanese speaker both visit
https://google.com in their web browser. They will see the
Google home page localized in German and Japanese, respectively. How
does Google know to return a different version of the homepage based on
the user’s preferred language? The answer lies in the REST architecture,
and how it separates the concepts of resources and representations.
In the REST architecture, the Google homepage is considered to be a single “resource,” represented by a unique URL. However, that single resource can have multiple “representations.” Representations are variations on how the content of the resource is presented to the client. The German and Japanese versions of the Google homepage are two representations of the same resource. To determine the best representation of a resource to return, HTTP clients and servers engage in a process called “content negotiation.” It works like this:
Clients specify the preferred representation through
Accept-*request headers.The server tries to match the preferred representation as best it can, and communicates back the chosen representation using
Content-*.
In the Google homepage example, the German speaker uses a browser
that is set to prefer content localized for German. Every HTTP request
made by the web browser will include a header
Accept-Language: de-DE. The server sees the request header,
and it will return a response localized for German (if it can). The HTTP
response will include a Content-Language: de-DE header to
inform the client of the language of the response content.
Language is just one factor for resource representation. More
importantly for us, resources can be represented using different content
types, such as HTML or HXML. Content negotiation over content type is
done using the Accept request header and
Content-Type response header. Web browsers set
text/html as the preferred content type in the
Accept header. The Hyperview client sets
application/vnd.hyperview+xml as the preferred content
type. This gives our backend a way to distinguish requests coming from a
web browser or Hyperview client, and serve the appropriate content to
each.
There are two main approaches to content negotiation: fine-grained and global.
Approach 1: Template Switching
When we ported the Contacts app from the web to mobile, we kept all
of the Flask views but made some minor changes. Specifically, we
introduced a new function render_to_response() and called
it in the return statement of each view. Here’s the function again to
refresh your memory:
def render_to_response(template_name, *args, **kwargs):
    content = render_template(template_name, *args, **kwargs)
    response = make_response(content)
    response.headers['Content-Type'] = 'application/vnd.hyperview+xml'
    return response
app.py
render_to_response() renders a template with the given
context, and turns it into a Flask response object with the appropriate
Hyperview Content-Type header. Obviously, the
implementation is highly-specific to serving our Hyperview mobile app.
But we can modify the function to do content negotiation based on the
request’s Accept header:
HTML_MIME = 'text/html'
HXML_MIME = 'application/vnd.hyperview+xml'

def render_to_response(
    html_template_name, hxml_template_name, *args, **kwargs <1>
):
    response_type = request.accept_mimetypes.best_match(
      [HTML_MIME, HXML_MIME], default=HTML_MIME) <2>
    template_name =
      hxml_template_name
      if response_type == HXML_MIME
      else html_template_name <3>
    content = render_template(template_name, *args, **kwargs)
    response = make_response(content)
    response.headers['Content-Type'] = response_type <4>
    return response
app.py
Function signature takes two templates, one for HTML and one for HXML.
Determine whether the client wants HTML or HXML.
Select the template based on the best match for the client.
Set the
Content-Typeheader based on the best match for the client.
Flask’s request object exposes an accept_mimetypes
property to help with content negotiation. We pass our two content MIME
types to request.accept_mimetypes.best_match() and get back
the MIME type that works for our client. Based on the best matching MIME
type, we choose to either render an HTML template or HXML template. We
also make sure to set the Content-Type header to the
appropriate MIME type. The only difference in our Flask views is that we
need to provide both an HTML and HXML template:
@app.route("/contacts/<contact_id>")
def contacts_view(contact_id=0):
    contact = Contact.find(contact_id)
    return render_to_response("show.html", "hv/show.xml",
      contact=contact)
app.py
Template switching between an HTML and HXML template, based on the client.
After updating all of the Flask views to support both templates, our backend will support both web browsers and our mobile app! This technique works well for the Contacts app because the screens in the mobile app map directly to pages of the web application. Each app has a dedicated page (or screen) for listing contacts, showing and editing details, and creating a new contact. This meant the Flask views could be kept as-is without major changes.
But what if we wanted to re-imagine the Contacts app UI for our mobile app? Perhaps we want the mobile app to use a single screen, with rows that expanded in-line to support viewing and editing the information? In situations where the UI diverges between platforms, Template Switching becomes cumbersome or impossible. We need a different approach to have one backend serve both hypermedia formats.
Approach 2: The Redirect Fork
If you recall, the Contacts web app has an index view,
routed from the root path /:
@app.route("/")
def index():
    return redirect("/contacts") <1>
app.py
Redirect requests from “/” to “/contacts”
When someone requests to the root path of the web application, Flask
redirects them to the /contacts path. This redirect also
works in our Hyperview mobile app. The Hyperview client’s
ENTRY_POINT_URL points to
http://0.0.0.0:5000/, and the server redirects it to
http://0.0.0.0:5000/contacts. But there’s no law that says
we need to redirect to the same path in our web application and mobile
app. What if we used the Accept header to redirect to
decide on the redirect path?
HTML_MIME = 'text/html'
HXML_MIME = 'application/vnd.hyperview+xml'

@app.route("/")
def index():
    response_type = request.accept_mimetypes.best_match(
      [HTML_MIME, HXML_MIME], default=HTML_MIME) <1>
    if response_type == HXML_MIME:
      return redirect("/mobile/contacts") <2>
    else:
      return redirect("/web/contacts") <3>
app.py
Determine whether the client wants HTML or HXML.
If the client wants HXML, redirect them to
/mobile/contacts.If the client wants HTML, redirect them to
/web/contacts.
The entry point is a fork in the road: if the client wants HTML, we redirect them to one path. If the client wants HXML, we redirect them to a different path. These redirects would be handled by different Flask views:
@app.route("/mobile/contacts")
def mobile_contacts():
  # Render an HXML response

@app.route("/web/contacts")
def web_contacts():
  # Render an HTML response
app.py
The mobile_contacts() view would render an HXML template
with a list of contacts. Tapping a contact item would open a screen
requested from /mobile/contacts/1, handled by a view
mobile_contacts_view. After the initial fork, all
subsequent requests from our mobile app go to paths prefixed with
/mobile/, and get handled by mobile-specific Flask views.
Likewise, all subsequent requests from the web app go to paths prefixed
with /web/, and get handled by web-specific Flask views.
(Note that in practice, we would want to separate the web and mobile
views into separate parts of our codebase: web_app.py and
mobile_app.py. We may also choose not to prefix the web
paths with /web/, if we want more elegant URLs displayed in
the browser’s address bar.)
You may be thinking that the Redirect Fork leads to a lot of code duplication. After all, we need to write double the number of views: one set for the web application, and one set for the mobile app. That is true, which is why the Redirect Fork is only preferred if the two platforms require a disjointed set of view logic. If the apps are similar on both platforms, Template Switching will save a lot of time and keep the apps consistent. Even if we need to use the Redirect Fork, the bulk of the logic in our models can be shared by both sets of views.
In practice, you may start out using Template Switching, but then realize you need to implement a fork for platform-specific features. In fact, we’re already doing that in the Contacts app. When porting the app from web to mobile, we didn’t bring over certain features like archiving functionality. The dynamic archive UI is a power feature that wouldn’t make sense on a mobile device. Since our HXML templates don’t expose any entry points to the Archive functionality, we can treat it as “web-only” and not worry about supporting it in Hyperview.
Contact.app, in Hyperview
We’ve covered a lot of ground in this chapter. Take a breath and take stock of how far we’ve come: we ported the core functionality of the Contact.app web application to mobile. And we did it by re-using much of our Flask backend and while sticking with Jinja templating. We again saw the utility of events for connecting different aspects of an application.
We’re not done yet. In the next chapter we’ll implement custom behaviors and UI elements to finish our mobile Contact.app.
Hypermedia Notes: API Endpoints
Unlike a JSON API, the hypermedia API you produce for your hypermedia-driven application should feature endpoints specialized for your particular application’s UI needs.
Because hypermedia APIs are not designed to be consumed by general-purpose clients you can set aside the pressure to keep them generalized and produce the content specifically needed for your application. Your endpoints should be optimized to support your particular applications UI/UX needs, not for a general-purpose data-access model for your domain model.
A related tip is that, when you have a hypermedia-based API, you can aggressively refactor your API in a way that is heavily discouraged when writing JSON API-based SPAs or mobile clients. Because hypermedia-based applications use Hypermedia As The Engine Of Application State, you are able and, in fact, encouraged, to change the shape of them as your application developers and as use cases change.
A great strength of the hypermedia approach is that you can completely rework your API to adapt to new needs over time without needing to version the API or even document it. Take advantage of it!