Contents
REST allows client functionality to be extended by downloading and executing code in the form of applets or scripts. This simplifies clients by reducing the number of features required to be pre-implemented.
— Roy Fielding, Architectural Styles and the Design of Network-based Software Architectures
Thus far we have (mostly) avoided writing any JavaScript (or _hyperscript) in Contact.app, mainly because the functionality we implemented has not required it. In this chapter we are going to look at scripting and, in particular, hypermedia-friendly scripting within the context of a Hypermedia-Driven Application.
Is Scripting Allowed?
A common criticism of the web is that it’s being misused. There is a narrative that WWW was created as a delivery system for “documents”, and only came to be used for “applications” by way of an accident or bizarre circumstances.
However, the concept of hypermedia challenges the split of document and application. Hypermedia systems like HyperCard, which preceded the web, featured rich capabilities for active and interactive experiences, including scripting.
HTML, as specified and implemented, does lack affordances needed to build highly interactive applications. This doesn’t mean, however, that hypermedia’s purpose is “documents” over “applications.”
Rather, while the theoretical foundation is there, the implementation is underdeveloped. With JavaScript being the only extension point and hypermedia controls not being well integrated to JavaScript (why can’t one click a link without halting the program?), developers have not internalized hypermedia and have instead used the web as a dumb pipe for apps that imitate “native” ones.
A goal of this book is to show that it is possible to build sophisticated web applications using the original technology of the web, hypermedia, without the application developer needing to reach for the abstractions provided by the large, popular JavaScript frameworks.
Htmx itself is, of course, written in JavaScript, and one of its advantages is that hypermedia interactions that go through htmx expose a rich interface to JavaScript code with configuration, events, and htmx’s own extension support.
Htmx expands the expressiveness of HTML enough that it removes the need for scripting in many situations. This makes htmx attractive to people who don’t want to write JavaScript, and there are many of those sorts of developers, wary of the complexity of Single Page Application frameworks.
However, dunking on JavaScript is not the aim of the htmx project. The goal of htmx is not less JavaScript, but less code, more readable and hypermedia-friendly code.
Scripting has been a massive force multiplier for the web. Using scripting, web application developers are not only able to enhance their HTML websites, but also create full-fledged client-side applications that can often compete with native, thick client applications.
This JavaScript-centric approach to building web applications is a testament to the power of the web and to the sophistication of web browsers in particular. It has its place in web development: there are situations where the hypermedia approach simply can’t provide the level of interaction that an SPA can.
However, in addition to this more JavaScript-centric style, we want to develop a style of scripting more compatible and consistent with Hypermedia-Driven Applications.
Scripting for Hypermedia
Borrowing from Roy Fielding’s notion of “constraints” defining REST, we offer two constraints of hypermedia-friendly scripting. You are scripting in an HDA-compatible manner if the following two constraints are adhered to:
The main data format exchanged between server and client must be hypermedia, the same as it would be without scripting.
Client-side state, outside the DOM itself, is kept to a minimum.
The goal of these constraints is to confine scripting to where it shines best and where nothing else comes close: interaction design. Business logic and presentation logic are the responsibility of the server, where we can pick whichever languages or tools are appropriate for our business domain.
Satisfying these two constraints sometimes requires us to diverge from what is typically considered best practice for JavaScript. Keep in mind that the cultural wisdom of JavaScript was largely developed in JavaScript-centric SPA applications.
The Hypermedia-Driven Application cannot as comfortably fall back on this tradition. This chapter is our contribution to the development of a new style and best practices for what we are calling Hypermedia-Driven Applications.
Unfortunately, simply listing “best practices” is rarely convincing or edifying. To be honest, it’s boring.
Instead, we will demonstrate these best practices by implementing client-side features in Contact.app. To cover different aspects of hypermedia-friendly scripting, we will implement three different features:
An overflow menu to hold the Edit, View and Delete actions, to clean up visual clutter in our list of contacts.
An improved interface for bulk deletion.
A keyboard shortcut for focusing the search box.
The important takeaway in the implementation of each of these features is that, while they are implemented entirely on the client-side using scripting, they don’t exchange information with the server via a non-hypermedia format, such as JSON, and that they don’t store a significant amount of state outside of the DOM itself.
Scripting Tools for the Web
The primary scripting language for the web is, of course, JavaScript, which is ubiquitous in web development today.
A bit of interesting internet lore, however, is that JavaScript was not always the only built-in option. As the quote from Roy Fielding at the start of this chapter hints, “applets” written in other languages such as Java were considered to be part of the scripting infrastructure of the web. In addition, there was a time period when Internet Explorer supported VBScript, a scripting language based on Visual Basic.
Today, we have a variety of transcompilers (often shortened to transpilers) that convert many languages to JavaScript, such as TypeScript, Dart, Kotlin, ClojureScript, F# and more. There is also the WebAssembly (WASM) bytecode format, which is supported as a compilation target for C, Rust, and the WASM-first language AssemblyScript.
However, most of these options are not geared towards a hypermedia-friendly style of scripting. Compile-to-JS languages are often paired with SPA-oriented libraries (Dart and AngularDart, ClojureScript and Reagent, F# and Elm), and WASM is currently mainly geared toward linking to C/C++ libraries from JavaScript.
We will instead focus on three client-side scripting technologies that are hypermedia-friendly:
VanillaJS, that is, using JavaScript without depending on any framework.
Alpine.js, a JavaScript library for adding behavior directly in HTML.
_hyperscript, a non-JavaScript scripting language created alongside htmx. Like AlpineJS, _hyperscript is usually embedded in HTML.
Let’s take a quick look at each of these scripting options, so we know what we are dealing with.
Note that, as with CSS, we are going to show you just enough of each of these options to give a flavor of how they work and, we hope, spark your interest in looking into any of them more extensively.
Vanilla JavaScript
No code is faster than no code.
— Merb (Ruby web framework), motto
Vanilla JavaScript is simply using plain JavaScript in your application, without any intermediate layers. The term “Vanilla” entered frontend web dev parlance as it became assumed that any sufficiently “advanced” web app would use some library with a name ending in “.js”. As JavaScript matured as a scripting language, however, standardized across browsers and provided more and more functionality, these frameworks and libraries became less important.
Somewhat ironically though, as JavaScript became more powerful and removed the need for the first generation of JavaScript libraries such as jQuery, it also enabled people to build complex SPA libraries. These SPA libraries are often even more elaborate than the original first generation of JavaScript libraries.
A quote from the website http://vanilla-js.com, which is well worth visiting even though it’s slightly out of date, captures the situation well:
VanillaJS is the lowest-overhead, most comprehensive framework I’ve ever used.
— http://vanilla-js.com
With JavaScript having matured as a scripting language, this is certainly the case for many applications. It is especially true in the case of HDAs, since, by using hypermedia, your application will not need many of the features typically provided by more elaborate Single Page Application JavaScript frameworks:
Client-side routing
An abstraction over DOM manipulation (i.e., templates that automatically update when referenced variables change)
Server side rendering 1
Attaching dynamic behavior to server-rendered tags on load (i.e., “hydration”)
Network requests
Without all this complexity being handled in JavaScript, your framework needs are dramatically reduced.
One of the best things about VanillaJS is how you install it: you don’t have to!
You can just start writing JavaScript in your web application, and it will simply work.
That’s the good news. The bad news is that, despite improvements over the last decade, JavaScript has some significant limitations as a scripting language that can make it less than ideal as a stand-alone scripting technology for Hypermedia-Driven Applications:
Being as established as it is, it has accreted a lot of features and warts.
It has a complicated and confusing set of features for working with asynchronous code.
Working with events is surprisingly difficult.
DOM APIs (a large portion of which were originally designed for Java, yes Java) are verbose and don’t have a habit of making common functionality easy to use.
None of these limitations are deal-breakers, of course. Many of them are gradually being fixed and many people prefer the “close to the metal” (for lack of a better term) nature of vanilla JavaScript over more elaborate client-side scripting approaches.
A Simple Counter
To dive into vanilla JavaScript as a front end scripting option, let’s create a simple counter widget.
Counter widgets are a common “Hello World” example for JavaScript frameworks, so looking at how it can be done in vanilla JavaScript (as well as the other options we are going to look at) will be instructive.
Our counter widget will be very simple: it will have a number, shown as text, and a button that increments the number.
One problem with tackling this problem in vanilla JavaScript is that it lacks one thing that most JavaScript frameworks provide: a default code and architectural style.
With vanilla JavaScript, there are no rules!
This isn’t all bad. It presents a great opportunity to take a small journey through various styles that people have developed for writing their JavaScript.
An inline implementation
To begin, let’s start with the simplest thing imaginable: all of our
JavaScript will be written inline, directly in the HTML. When the button
is clicked, we will look up the output element holding the
number, and increment the number contained within it.
<section class="counter">
  <output id="my-output">0</output>  <1>
  <button
    onclick=" <2>
      document.querySelector('#my-output') <3>
        .textContent++ <4>
    "
  >Increment</button>
</section>
Counter in vanilla JavaScript, inline version
Our output element has an ID to help us find it.
We use the
onclickattribute to add an event listener.Find the output via a querySelector() call.
JavaScript allows us use the
++operator on strings.
Not too bad.
It’s not the most beautiful code, and can be irritating especially if you aren’t used to the DOM APIs.
It’s a little annoying that we needed to add an id to
the output element. The
document.querySelector() function is a bit verbose compared
with, say, the $ function, as provided by jQuery.
But it works. It’s also easy enough to understand, and crucially it doesn’t require any other JavaScript libraries.
So that’s the simple, inline approach with VanillaJS.
Separating our scripting out
While the inline implementation is simple in some sense, a more
standard way to write this would be to move the code into a separate
JavaScript file. This JavaScript file would then either be linked to via
a <script src> tag or placed into an inline
<script> tag by a build process.
Here we see the HTML and JavaScript separated out from one another, in different files. The HTML is now “cleaner” in that there is no JavaScript in it.
The JavaScript is a bit more complex than in our inline version: we need to look up the button using a query selector and add an event listener to handle the click event and increment the counter.
<section class="counter">
  <output id="my-output">0</output>
  <button class="increment-btn">Increment</button>
</section>
Counter HTML
const counterOutput = document.querySelector("#my-output"), <1>
  incrementBtn = document.querySelector(".counter .increment-btn") <2>

incrementBtn.addEventListener("click", e => { <3>
  counterOutput.innerHTML++ <4>
})
Counter JavaScript
Find the output element.
Find the button.
We use
addEventListener, which is preferable toonclickfor many reasons.The logic stays the same, only the structure around it changes.
In moving the JavaScript out to another file, we are following a software design principle known as Separation of Concerns (SoC).
Separation of Concerns posits that the various “concerns” (or aspects) of a software project should be divided up into multiple files, so that they don’t “pollute” one another. JavaScript isn’t markup, so it shouldn’t be in your HTML, it should be elsewhere. Styling information, similarly, isn’t markup, and so it belongs in a separate file as well (A CSS file, for example.)
For quite some time, this Separation of Concerns was considered the “orthodox” way to build web applications.
A stated goal of Separation of Concerns is that we should be able to modify and evolve each concern independently, with confidence that we won’t break any of the other concerns.
However, let’s look at exactly how this principle has worked out in our simple counter example. If you look closely at the new HTML, it turns out that we’ve had to add a class to the button. We added this class so that we could look the button up in JavaScript and add in an event handler for the “click” event.
Now, in both the HTML and the JavaScript, this class name is just a string and there isn’t any process to verify that the button has the right classes on it or its ancestors to ensure that the event handler is actually added to the right element.
Unfortunately, it has turned out that the careless use of CSS selectors in JavaScript can cause what is known as jQuery soup. jQuery soup is a situation where:
The JavaScript that attaches a given behavior to a given element is difficult to find.
Code reuse is difficult.
The code ends up wildly disorganized and “flat”, with lots of unrelated event handlers mixed together.
The name “jQuery soup” comes from the fact that most JavaScript-heavy applications used to be built in jQuery (many still are), which, perhaps inadvertently, tended to encourage this style of JavaScript.
So, you can see that the notion of Separation of Concerns doesn’t always work as well as promised: our concerns end up intertwined or coupled pretty deeply, even when we separate them into different files.
 EXPECTATION              REALITY

 HTML   CSS    JS         HTML   CSS    JS
┌────┐ ┌────┐ ┌────┐     ┌────┐ ┌────┐ ┌────┐
│    │ │    │ │    │     │    │ │    │ │    │
│ C  │ │ C  │ │ c  │     │ CO │ │ NC │ │ern │
│ O  │ │ o  │ │ o  │     │    │ │    │ │    │
│ N  │ │ n  │ │ n  │     │ Co │ │ nc │ │ERN │
│ C  │ │ c  │ │ c  │     │    │ │    │ │    │
│ E  │ │ e  │ │ e  │     │ co │ │ NC │ │ERN │
│ R  │ │ r  │ │ r  │     │    │ │    │ │    │
│ N  │ │ n  │ │ n  │     │ CO │ │ Nc │ │ern │
│    │ │    │ │    │     │    │ │    │ │    │
└────┘ └────┘ └────┘     └────┘ └────┘ └────┘
What concerns?
To show that it isn’t just naming between concerns that can get you
into trouble, consider another small change to our HTML that
demonstrates the problems with our separation of concerns: imagine that
we decide to change the number field from an <output>
tag to an <input type="number">.
This small change to our HTML will break our JavaScript, despite the fact we have “separated” our concerns.
The fix for this issue is simple enough (we would need to change the
.textContent property to .value property), but
it demonstrates the burden of synchronizing markup changes and code
changes across multiple files. Keeping everything in sync can become
increasingly difficult as your application size increases.
The fact that small changes to our HTML can break our scripting indicates that the two are tightly coupled, despite being broken up into multiple files. This tight coupling suggests that separation between HTML and JavaScript (and CSS) is often an illusory separation of concerns: the concerns are sufficiently related to one another that they aren’t easily separated.
In Contact.app we are not concerned with “structure,” “styling” or “behavior”; we are concerned with collecting contact info and presenting it to users. SoC, in the way it’s formulated in web development orthodoxy, is not really an inviolate architectural guideline, but rather a stylistic choice that, as we can see, can even become a hindrance.
Locality of Behavior
It turns out that there is a burgeoning reaction against the Separation of Concerns design principle. Consider the following web technologies and techniques:
JSX
LitHTML
CSS-in-JS
Single-File Components
Filesystem based routing
Each of these technologies colocate code in various languages that address a single feature (typically a UI widget).
All of them mix implementation concerns together in order to present a unified abstraction to the end-user. Separating technical detail concerns just isn’t as much of an, ahem, concern.
Locality of Behavior (LoB) is an alternative software design principle that we coined, in opposition to Separation of Concerns. It describes the following characteristic of a piece of software:
The behavior of a unit of code should be as obvious as possible by looking only at that unit of code.
— https://htmx.org/essays/locality-of-behaviour/
In simple terms: you should be able to tell what a button does by simply looking at the code or markup that creates that button. This does not mean you need to inline the entire implementation, but that you shouldn’t need to hunt for it or require prior knowledge of the codebase to find it.
We will demonstrate Locality of Behavior in all of our examples, both the counter demos and the features we add to Contact.app. Locality of behavior is an explicit design goal of both _hyperscript and Alpine.js (which we will cover later) as well as htmx.
All of these tools achieve Locality of Behavior by having you embed attributes directly within your HTML, as opposed to having code look up elements in a document through CSS selectors in order to add event listeners onto them.
In a Hypermedia-Driven Application, we feel that the Locality of Behavior design principle is often more important than the more traditional Separation of Concerns design principle.
What to do with our counter?
So, should we go back to the onclick attribute way of
doing things? That approach certainly wins in Locality of Behavior, and
has the additional benefit that it is baked into HTML.
Unfortunately, however, the on* JavaScript attributes
also come with some drawbacks:
They don’t support custom events.
There is no good mechanism for associating long-lasting variables with an element — all variables are discarded when an event listener completes executing.
If you have multiple instances of an element, you will need to repeat the listener code on each, or use something more clever like event delegation.
JavaScript code that directly manipulates the DOM gets verbose, and clutters the markup.
An element cannot listen for events on another element.
Consider this common situation: you have a popup, and you want it to be dismissed when a user clicks outside of it. The listener will need to be on the body element in this situation, far away from the actual popup markup. This means that the body element would need to have listeners attached to it that deal with many unrelated components. Some of these components may not even be on the page when it was first rendered, if they are added dynamically after the initial HTML page is rendered.
So vanilla JavaScript and Locality of Behavior don’t seem to mesh quite as well as we would like them to.
The situation is not hopeless, however: it’s important to understand that LoB does not require behavior to be implemented at a use site, but merely invoked there. That is, we don’t need to write all our code on a given element, we just need to make it clear that a given element is invoking some code, which can be located elsewhere.
Keeping this in mind, it is possible to improve LoB while writing JavaScript in a separate file, provided we have a reasonable system for structuring our JavaScript.
RSJS
(the “Reasonable System for JavaScript Structure,” https://ricostacruz.com/rsjs/) is a set of guidelines for JavaScript architecture targeted at “a typical non-SPA website.” RSJS provides a solution to the lack of a standard code style for vanilla JavaScript that we mentioned earlier.
Here are the RSJS guidelines most relevant for our counter widget:
“Use
data-attributes” in HTML: invoking behavior via adding data attributes makes it obvious there is JavaScript happening, as opposed to using random classes or IDs that may be mistakenly removed or changed.“One component per file”: the name of the file should match the data attribute so that it can be found easily, a win for LoB.
To follow the RSJS guidelines, let’s restructure our current HTML and
JavaScript files. First, we will use data attributes, that is,
HTML attributes that begin with data-, a standard feature
of HTML, to indicate that our HTML is a counter component. We will then
update our JavaScript to use an attribute selector that looks for the
data-counter attribute as the root element in our counter
component and wires in the appropriate event handlers and logic.
Additionally, let’s rework the code to use
querySelectorAll() and add the counter functionality to
all counter components found on the page. (You never know how
many counters you might want!)
Here is what our code looks like now:
<section class="counter" data-counter> <1>
  <output id="my-output" data-counter-output>0</output> <2>
  <button class="increment-btn" data-counter-increment>Increment</button>
</section>
Counter in vanilla JavaScript, with RSJS
Invoke a JavaScript behavior with a data attribute.
Mark relevant descendant elements.
// counter.js <1>
document.querySelectorAll("[data-counter]") <2>
  .forEach(el => {
    const
    output = el.querySelector("[data-counter-output]"),
    increment = el.querySelector("[data-counter-increment]"); <3>

    increment.addEventListener("click", e => output.textContent++); <4>
  });
File should have the same name as the data attribute, so that we can locate it easily.
Get all elements that invoke this behavior.
Get any child elements we need.
Register event handlers.
Using RSJS solves, or at least alleviates, many of the problems we pointed out with our first, unstructured example of VanillaJS being split out to a separate file:
The JS that attaches behavior to a given element is clear (though only through naming conventions).
Reuse is easy — you can create another counter component on the page and it will just work.
The code is well-organized — one behavior per file.
All in all, RSJS is a good way to structure your vanilla JavaScript in a Hypermedia-Driven Application. So long as the JavaScript isn’t communicating with a server via a plain data JSON API, or holding a bunch of internal state outside of the DOM, this is perfectly compatible with the HDA approach.
Let’s implement a feature in Contact.app using the RSJS/vanilla JavaScript approach.
VanillaJS in Action: An Overflow Menu
Our homepage has “Edit”, “View” and “Delete” links for every contact in our table. This uses a lot of space and creates visual clutter. Let’s fix that by placing these actions inside a drop-down menu with a button to open it.
If you’re less familiar with JavaScript and the code here starts to feel too complicated, don’t worry; the Alpine.js and _hyperscript examples — which we’ll look at next — are easier to follow.
Let’s begin by sketching the markup we want for our dropdown menu.
First, we need an element, we’ll use a <div>, to
enclose the entire widget and mark it as a menu component. Within this
div, we will have a standard <button> that will
function as the mechanism that shows and hides our menu items. Finally,
we’ll have another <div> that holds the menu items
that we are going to show.
These menu items will be simple anchor tags, as they are in the current contacts table.
Here is what our updated, RSJS-structured HTML looks like:
<div data-overflow-menu> <1>
    <button type="button" aria-haspopup="menu"
        aria-controls="contact-menu-{{ contact.id }}"
        >Options</button> <2>
    <div role="menu" hidden id="contact-menu-{{ contact.id }}"> <3>
        <a role="menuitem"
          href="/contacts/{{ contact.id }}/edit">Edit</a> <4>
        <a role="menuitem" href="/contacts/{{ contact.id }}">View</a>
        <!-- ... -->
    </div>
</div>
Mark the root element of the menu component
This button will open and close our menu
A container for our menu items
Menu items
The roles and ARIA attributes are based on the Menu and Menu Button patterns from the ARIA Authoring Practices Guide.
On the JS side of our implementation, we’ll begin with the RSJS boilerplate: query for all elements with some data attribute, iterate over them, get any relevant descendants.
Note that, below, we’ve modified the RSJS boilerplate a bit to integrate with htmx; we load the overflow menu when htmx loads new content.
function overflowMenu(tree = document) {
  tree.querySelectorAll("[data-overflow-menu]").forEach(menuRoot => { <1>
    const
    button = menuRoot.querySelector("[aria-haspopup]"), <2>
    menu = menuRoot.querySelector("[role=menu]"), <3>
    items = [...menu.querySelectorAll("[role=menuitem]")];
  });
}

addEventListener("htmx:load", e => overflowMenu(e.target)); <4>
With RSJS, you’ll be writing
document.querySelectorAll(…).forEacha lot.To keep the HTML clean, we use ARIA attributes rather than custom data attributes here.
Use the spread operator to convert a
NodeListinto a normalArray.Initialize all overflow menus when the page is loaded or content is inserted by htmx.
Conventionally, we would keep track of whether the menu is open using a JavaScript variable or a property in a JavaScript state object. This approach is common in large, JavaScript-heavy web applications.
However, this approach has some drawback:
We would need to keep the DOM in sync with the state (harder without a framework).
We would lose the ability to serialize the HTML (as this open state isn’t stored in the DOM, but rather in JavaScript).
Instead of taking this approach, we will use the DOM to store our
state. We’ll lean on the hidden attribute on the menu
element to tell us it’s closed. If the HTML of the page is snapshotted
and restored, the menu can be restored as well by simply re-running the
JS.
items = [...menu.querySelectorAll("[role=menuitem]")]; <1>

const isOpen = () => !menu.hidden; <2>
We get the list of menu items at the start. This implementation will not support dynamically adding or removing menu items.
The
hiddenattribute is helpfully reflected as ahiddenproperty, so we don’t need to usegetAttribute.
We’ll also make the menu items non-tabbable, so we can manage their focus ourselves.
items.forEach(item => item.setAttribute("tabindex", "-1"));Now let’s implement toggling the menu in JavaScript:
function toggleMenu(open = !isOpen()) { <1>
  if (open) {
    menu.hidden = false;
    button.setAttribute("aria-expanded", "true");
    items[0].focus(); <2>
  } else {
    menu.hidden = true;
    button.setAttribute("aria-expanded", "false");
  }
}

toggleMenu(isOpen()); <3>
button.addEventListener("click", () => toggleMenu()); <4>
menuRoot.addEventListener("blur", e => toggleMenu(false)); <5>
Optional parameter to specify desired state. This allows us to use one function to open, close, or toggle the menu.
Focus first item of menu when opened.
Call
toggleMenuwith current state, to initialize element attributes.Toggle menu when button is clicked.
Close menu when focus moves away.
Let’s also make the menu close when we click outside it, a nice behavior that mimics how native drop-down menus work. This will require an event listener on the whole window.
Note that we need to be careful with this kind of listener: you may find that listeners accumulate as components add listeners and fail to remove them when the component is removed from the DOM. This, unfortunately, leads to difficult to track down memory leaks.
There is not an easy way in JavaScript to execute logic when an
element is removed. The best option is what is known as the
MutationObserver API. A MutationObserver is
very useful, but the API is quite heavy and a bit arcane, so we won’t be
using it for our example.
Instead, we will use a simple pattern to avoid leaking event listeners: when our event listener runs, we will check if the attaching component is still in the DOM, and, if the element is no longer in the DOM, we will remove the listener and exit.
This is a somewhat hacky, manual form of garbage collection. As is (usually) the case with other garbage collection algorithms, our strategy removes listeners in a nondeterministic amount of time after they are no longer needed. Fortunately for us, With a frequent event like “the user clicks anywhere in the page” driving the collection, it should work well enough for our system.
window.addEventListener("click", function clickAway(event) {
  if (!menuRoot.isConnected)
    window.removeEventListener("click", clickAway); <1>
  if (!menuRoot.contains(event.target)) toggleMenu(false); <2>
});
This line is the garbage collection.
If the click is outside the menu, close the menu.
Now, let’s move on to the keyboard interactions for our dropdown menu. The keyboard handlers turn out to all be pretty similar to one another and not particularly intricate, so let’s knock them all out in one go:
const currentIndex = () => { <1>
  const idx = items.indexOf(document.activeElement);
  if (idx === -1) return 0;
  return idx;
}

menu.addEventListener("keydown", e => {
  if (e.key === "ArrowUp") {
    items[currentIndex() - 1]?.focus(); <2>

  } else if (e.key === "ArrowDown") {
    items[currentIndex() + 1]?.focus(); <3>

  } else if (e.key === "Space") {
    items[currentIndex()].click(); <4>

  } else if (e.key === "Home") {
    items[0].focus(); <5>

  } else if (e.key === "End") {
    items[items.length - 1].focus(); <6>

  } else if (e.key === "Escape") {
    toggleMenu(false); <7>
    button.focus(); <8>
  }
});
Helper: Get the index in the items array of the currently focused menu item (0 if none).
Move focus to the previous menu item when the up arrow key is pressed.
Move focus to the next menu item when the down arrow key is pressed.
Activate the currently focused element when the space key is pressed.
Move focus to the first menu item when Home is pressed.
Move focus to the last menu item when End is pressed.
Close menu when Escape is pressed.
Return focus to menu button when closing menu.
That should cover all our bases, and we’ll admit that’s a lot of code. But, in fairness, it’s code that encodes a lot of behavior.
Now, our drop-down menu isn’t perfect, and it doesn’t handle a lot of
things. For example, we don’t support submenus, or menu items being
added or removed dynamically to the menu. If we needed more menu
features like this, it might make more sense to use an off-the-shelf
library, such as GitHub’s details-menu-element.
But, for our relatively simple use case, vanilla JavaScript does a fine job, and we got to explore ARIA and RSJS while implementing it.
Alpine.js
OK, so that’s an in-depth look at how to structure plain VanillaJS-style JavaScript. Let’s turn our attention to an actual JavaScript framework that enables a different approach for adding dynamic behavior to your application, Alpine.js.
Alpine is a relatively new JavaScript library that allows developers
to embed JavaScript code directly in HTML, akin to the on*
attributes available in plain HTML and JavaScript. However, Alpine takes
this concept of embedded scripting much further than on*
attributes.
Alpine bills itself as a modern replacement for jQuery, the widely used, older JavaScript library. As you will see, it definitely lives up to this promise.
Installing Alpine is very easy: it is a single file and is dependency-free, so you can simply include it via a CDN:
<script src="https://unpkg.com/alpinejs"></script>Installing Alpine
You can also install it via a package manager such as NPM, or vendor it from your own server.
Alpine provides a set of HTML attributes, all of which begin with the
x- prefix, the main one of which is x-data.
The content of x-data is a JavaScript expression which
evaluates to an object. The properties of this object can, then, be
accessed within the element that the x-data attribute is
located.
To get a flavor of AlpineJS, let’s look at how to implement our counter example using it.
For the counter, the only state we need to keep track of is the
current number, so let’s declare a JavaScript object with one property,
count, in an x-data attribute on the div for
our counter:
<div class="counter" x-data="{ count: 0 }">Counter with Alpine, line 1
This defines our state, that is, the data we are going to be using to
drive dynamic updates to the DOM. With the state declared like this, we
can now use it within the div element it is declared on. Let’s
add an output element with an x-text
attribute.
Next, we will bind the x-text attribute to the
count attribute we declared in the x-data
attribute on the parent div element. This will have the
effect of setting the text of the output element to
whatever the value of count is: if count is
updated, so will the text of the output. This is “reactive”
programming, in that the DOM will “react” to changes to the backing
data.
<div x-data="{ count: 0 }">
  <output x-text="count"></output> <1>
Counter with Alpine, lines 1-2
The
x-textattribute.
Next, we need to update the count, using a button. Alpine allows you
to attach event listeners with the x-on attribute.
To specify the event to listen for, you add a colon and then the
event name after the x-on attribute name. Then, the value
of the attribute is the JavaScript you wish to execute. This is similar
to the plain on* attributes we discussed earlier, but it
turns out to be much more flexible.
We want to listen for a click event, and we want to
increment count when a click occurs, so here is what the
Alpine code will look like:
<div x-data="{ count: 0 }">
  <output x-text="count"></output>

  <button x-on:click="count++">Increment</button> <1>
</div>
Counter with Alpine, the full thing
With
x-on, we specify the event in the attribute name.
And that’s all it takes. A simple component like a counter should be simple to code, and Alpine delivers.
“x-on:click” vs. “onclick”
As we said, the Alpine x-on:click attribute (or its
shorthand, the @click attribute) is similar to the built-in
onclick attribute. However, it has additional features that
make it significantly more useful:
You can listen for events from other elements. For example, the
.outsidemodifier lets you listen to any click event that is not within the element.You can use other modifiers to:
throttle or debounce event listeners
ignore events that are bubbled up from descendant elements
attach passive listeners
You can listen to custom events. For example, if you wanted to listen for the
htmx:after-requestevent you could writex-on:htmx:after-request="doSomething()".
Reactivity and Templating
We hope you’ll agree that the AlpineJS version of the counter widget is better, in general, than the VanillaJS implementation, which was either somewhat hacky or spread out over multiple files.
A big part of the power of AlpineJS is that it supports a notion of
“reactive” variables, allowing you to bind the count of the
div element to a variable that both the output
and the button can reference, and properly updating all the
dependencies when a mutation occurs. Alpine allows for much more
elaborate data bindings than we have demonstrated here, and it is an
excellent general purpose client-side scripting library.
Alpine.js in Action: A Bulk Action Toolbar
Let’s implement a feature in Contact.app with Alpine. As it stands currently, Contact.app has a “Delete Selected Contacts” button at the very bottom of the page. This button has a long name, is not easy to find and takes up a lot of room. If we wanted to add additional “bulk” actions, this wouldn’t scale well visually.
In this section, we’ll replace this single button with a toolbar. Furthermore, the toolbar will only appear when the user starts selecting contacts. Finally, it will show how many contacts are selected and let you select all contacts in one go.
The first thing we will need to add is an x-data
attribute, to hold the state that we will use to determine if the
toolbar is visible or not. We will need to place this on an ancestor
element of both the toolbar that we are going to add, as well as the
checkboxes, which will be updating the state when they are checked and
unchecked. The best option given our current HTML is to place the
attribute on the form element that surrounds the contacts
table. We will declare a property, selected, which will be
an array that holds the selected contact ids, based on the checkboxes
that are selected.
Here is what our form tag will look like:
<form x-data="{ selected: [] }"> <1>This form wraps around the contacts table.
Next, at the top of the contacts table, we are going to add a
template tag. A template tag is not rendered by a
browser, by default, so you might be surprised that we are using it.
However, by adding an Alpine x-if attribute, we can tell
Alpine: if a condition is true, show the HTML within this template.
Recall that we want to show the toolbar if and only if one or more
contacts are selected. But we know that we will have the ids of the
selected contacts in the selected property. Therefore, we
can check the length of that array to see if there are any
selected contacts, quite easily:
<template x-if="selected.length > 0"> <1>
  <div class="box info tool-bar">
    <slot x-text="selected.length"></slot>
    contacts selected

    <button type="button" class="bad bg color border">Delete</button> <2>
    <hr aria-orientation="vertical">
    <button type="button">Cancel</button> <2>
  </div>
</template>
Show this HTML if there are 1 or more selected contacts.
We will implement these buttons in just a moment.
The next step is to ensure that toggling a checkbox for a given
contact adds (or removes) a given contact’s id from the
selected property. To do this, we will need to use a new
Alpine attribute, x-model. The x-model
attribute allows you to bind a given element to some underlying
data, or its “model.”
In this case, we want to bind the value of the checkbox inputs to the
selected property. This is how we do this:
<td>
  <input type="checkbox" name="selected_contact_ids"
    value="{{ contact.id }}" x-model="selected"> <1>
</td>
The
x-modelattribute binds thevalueof this input to theselectedproperty
Now, when a checkbox is checked or unchecked, the
selected array will be updated with the given row’s contact
id. Furthermore, mutations we make to the selected array
will similarly be reflected in the checkboxes” state. This is known as a
two-way binding.
With this code written, we can make the toolbar appear and disappear, based on whether contact checkboxes are selected.
Very slick.
Before we move on, you may have noticed our code here includes some “class=” references. These are for css styling, and are not part of Alpine.js. We’ve included them only as a reminder that the menu bar we’re building will require css to work well. The classes in the code above refer to a minimal css library called Missing.css. If you use other css libraries, such as Bootstrap, Tailwind, Bulma, Pico.css, etc., your styling code will be different.
Implementing actions
Now that we have the mechanics of showing and hiding the toolbar, let’s look at how to implement the buttons within the toolbar.
Let’s first implement the “Clear” button, because it is quite easy.
All we need to do is, when the button is clicked, clear out the
selected array. Because of the two-way binding that Alpine
provides, this will uncheck all the selected contacts (and then hide the
toolbar)!
For the Cancel button, our job is simple:
<button type="button" @click="selected = []">Cancel</button> <1>Reset the
selectedarray.
Once again, AlpineJS makes this very easy.
The “Delete” button, however, will be a bit more complicated. It will
need to do two things: first it will confirm if the user indeed intends
to delete the contacts selected. Then, if the user confirms the action,
it will use the htmx JavaScript API to issue a DELETE
request.
<button type="button" class="bad bg color border"
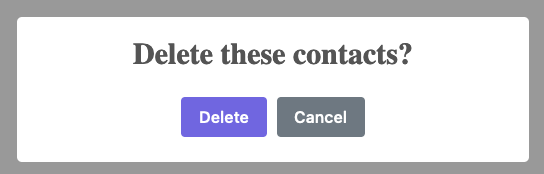
@click="
confirm(`Delete ${selected.length} contacts?`) && <1>
htmx.ajax('DELETE', '/contacts',
{ source: $root, target: document.body }) <2>
">
Delete
</button>Confirm the user wishes to delete the selected number of contacts.
Issue a
DELETEusing the htmx JavaScript API.
Note that we are using the short-circuiting behavior of the
&& operator in JavaScript to avoid the call to
htmx.ajax() if the confirm() call returns
false.
The htmx.ajax() function is just a way to access the
normal, HTML-driven hypermedia exchange that htmx’s HTML attributes give
you directly from JavaScript.
Looking at how we call htmx.ajax, we first pass in that
we want to issue a DELETE to /contacts. We
then pass in two additional pieces of information: source
and target. The source property is the element
from which htmx will collect data to include in the request. We set this
to $root, which is a special symbol in Alpine that will be
the element that has the x-data attribute declared on it.
In this case, it will be the form containing all of our contacts. The
target, or where the response HTML will be placed, is just
the entire document’s body, since the DELETE handler
returns a whole page when it completes.
Note that we are using Alpine here in a Hypermedia-Driven Application
compatible manner. We could have issued an AJAX request
directly from Alpine and perhaps updated an x-data property
depending on the results of that request. But, instead, we delegated to
htmx’s JavaScript API, which made a hypermedia exchange with
the server.
This is the key to scripting in a hypermedia-friendly manner within a Hypermedia-Driven Application.
So, with all of this in place, we now have a much improved experience for performing bulk actions on contacts: less visual clutter and the toolbar can be extended with more options without creating bloat in the main interface of our app.
_hyperscript
The final scripting technology we are going to look at is a bit further afield: _hyperscript. The authors of this book initially created _hyperscript as a sibling project to htmx. We felt that JavaScript wasn’t event-oriented enough, which made adding small scripting enhancements to htmx applications cumbersome.
While the previous two examples are JavaScript-oriented, _hyperscript has a completely different syntax than JavaScript, based on an older language called HyperTalk. HyperTalk was the scripting language for a technology called HyperCard, an old hypermedia system available on early Macintosh Computers.
The most noticeable thing about _hyperscript is that it resembles English prose more than it resembles other programming languages.
Like Alpine, _hyperscript is a modern jQuery replacement. Also like Alpine, _hyperscript allows you to write your scripting inline, in HTML.
Unlike Alpine, however, _hyperscript is not reactive. It instead focuses on making DOM manipulations in response to events easy to write and easy to read. It has built-in language constructs for many DOM operations, preventing you from needing to navigate the sometimes-verbose JavaScript DOM APIs.
We will give a small taste of what scripting in the _hyperscript language is like, so you can pursue the language in more depth later if you find it interesting.
Like htmx and AlpineJS, _hyperscript can be installed via a CDN or
from npm (package name hyperscript.org):
<script src="//unpkg.com/hyperscript.org"></script>Installing _hyperscript via CDN
_hyperscript uses the _ (underscore) attribute for
putting scripting on DOM elements. You may also use the
script or data-script attributes, depending on
your HTML validation needs.
Let’s look at how to implement the simple counter component we have
been looking at using _hyperscript. We will place an output
element and a button inside of a div. To
implement the counter, we will need to add a small bit of _hyperscript
to the button. On a click, the button should increment the text of the
previous output tag.
As you’ll see, that last sentence is close to the actual _hyperscript code:
<div class="counter">
  <output>0</output>
  <button _="on click
    increment the textContent of the previous <output/>"> <1>
    Increment
  </button>
</div>
The _hyperscript code added inline to the button.
Let’s go through each component of this script:
on clickis an event listener, telling the button to listen for aclickevent and then executing the remaining code.incrementis a “command” in _hyperscript that “increments” things, similar to the++operator in JavaScript.thedoesn’t have any semantic meaning in _hyperscript, but can be used to make scripts more readable.textContent ofis one form of property access in _hyperscript. You are probably familiar with the JavaScript syntaxa.b, meaning “Get the propertybon objecta. _hyperscript supports this syntax, but also supports the formsb of aanda’s b. Which one you use should depend on which one is most readable.previousis an expression in _hyperscript that finds the previous element in the DOM that matches some condition.<output />is a query literal, which is a CSS selector wrapped between<and/>.
In this code, the previous keyword (and the accompanying
next keyword) is an example of how _hyperscript makes DOM
operations easier: there is no such native functionality to be found in
the standard DOM API, and implementing this in VanillaJS is trickier
than you might think!
So, you can see, _hyperscript is very expressive, particularly when it comes to DOM manipulations. This makes it easier to embed scripts directly in HTML: since the scripting language is more powerful, scripts written in it tend to be shorter and easier to read.
_hyperscript in Action: A Keyboard Shortcut
While the counter demo is a good way to compare various approaches to scripting, the rubber meets the road when you try to actually implement a useful feature with an approach. For _hyperscript, let’s add a keyboard shortcut to Contact.app: when a user hits Alt+S in our app, we will focus the search field.
Since our keyboard shortcut focuses the search input, let’s put the code for it on that search input, satisfying locality.
Here is the original HTML for the search input:
<input id="search" name="q" type="search" placeholder="Search Contacts">We will add an event listener using the on keydown
syntax, which will fire whenever a keydown occurs. Further, we can use
an event filter syntax in _hyperscript using square brackets
after the event. In the square brackets we can place a filter
expression that will filter out keydown events we
aren’t interested in. In our case, we only want to consider events where
the Alt key is held down and where the “S” key is being pressed. We can
create a boolean expression that inspects the altKey
property (to see if it is true) and the code
property (to see if it is "KeyS") of the event to achieve
this.
So far our _hyperscript looks like this:
on keydown[altKey and code is 'KeyS'] ...
A start on our keyboard shortcut
Now, by default, _hyperscript will listen for a given event on
the element where it is declared. So, with the script we have, we
would only get keydown events if the search box is already
focused. That’s not what we want! We want to have this key work
globally, no matter which element has focus.
Not a problem! We can listen for the keyDown event
elsewhere by using a from clause in our event handler. In
this case we want to listen for the keyDown from the
window, and our code ends up looking, naturally, like this:
on keydown[altKey and code is 'KeyS'] from window ...
Listening globally
Using the from clause, we can attach the listener to the
window while, at the same time, keeping the code on the element it
logically relates to.
Now that we’ve picked out the event we want to use to focus the
search box, let’s implement the actual focusing by calling the standard
.focus() method.
Here is the entire script, embedded in HTML:
<input id="search" name="q" type="search" placeholder="Search Contacts"
  _="on keydown[altKey and code is 'KeyS'] from the window
    focus() me"> <1>
Our final script
“me” refers to the element that the script is written on.
Given all the functionality, this is surprisingly terse, and, as an English-like programming language, pretty easy to read.
Why a New Programming Language?
This is all well and good, but you may be thinking “An entirely new scripting language? That seems excessive.” And, at some level, you are right: JavaScript is a decent scripting language, is very well optimized and is widely understood in web development. On the other hand, by creating an entirely new front end scripting language, we had the freedom to address some problems that we saw generating ugly and verbose code in JavaScript:
- Async transparency
-
In _hyperscript, asynchronous functions (i.e., functions that return
Promiseinstances) can be invoked as if they were synchronous. Changing a function from sync to async does not break any _hyperscript code that calls it. This is achieved by checking for a Promise when evaluating any expression, and suspending the running script if one exists (only the current event handler is suspended and the main thread is not blocked). JavaScript, instead, requires either the explicit use of callbacks or the use of explicitasyncannotations (which can’t be mixed with synchronous code). - Array property access
-
In _hyperscript, accessing a property on an array (other than
lengthor a number) will return an array of the values of property on each member of that array, making array property access act like a flat-map operation. jQuery has a similar feature, but only for its own data structure. - Native CSS Syntax
-
In _hyperscript, you can use things like CSS class and ID literals, or CSS query literals, directly in the language, rather than needing to call out to a wordy DOM API, as you do in JavaScript.
- Deep Event Support
-
Working with events in _hyperscript is far more pleasant than working with them in JavaScript, with native support for responding to and sending events, as well as for common event-handling patterns such as “debouncing” or rate limiting events. _hyperscript also provides declarative mechanisms for synchronizing events within a given element and across multiple elements.
Again we wish to stress that, in this example, we are not stepping outside the lines of a Hypermedia-Driven Application: we are only adding frontend, client-side functionality with our scripting. We are not creating and managing a large amount of state outside of the DOM itself, or communicating with the server in a non-hypermedia exchange.
Additionally, since _hyperscript embeds so well in HTML, it keeps the focus on the hypermedia, rather than on the scripting logic.
It may not fit all scripting styles or needs, but _hyperscript can provide an excellent scripting experience for Hypermedia-Driven Applications. It is a small and obscure programming language worth a look to understand what it is trying to achieve.
Using Off-the-Shelf Components
That concludes our look at three different options for your scripting infrastructure, that is, the code that you write to enhance your Hypermedia-Driven Application. However, there is another major area to consider when discussing client side scripting: “off the shelf” components. That is, JavaScript libraries that other people have created that offer some sort of functionality, such as showing modal dialogs.
Components have become very popular in the web development world, with libraries like DataTables providing rich user experiences with very little JavaScript code on the part of a user. Unfortunately, if these libraries aren’t integrated well into a website, they can begin to make an application feel “patched together.” Furthermore, some libraries go beyond simple DOM manipulation, and require that you integrate with a server endpoint, almost invariably with a JSON data API. This means you are no longer building a Hypermedia-Driven Application, simply because a particular widget demands something different. A shame!
Integration Options
The best JavaScript libraries to work with when you are building a Hypermedia-Driven Application are ones that:
Mutate the DOM but don’t communicate with a server over JSON
Respect HTML norms (e.g., using
inputelements to store values)Trigger many custom events as the library updates things
The last point, triggering many custom events (over the alternative of using lots of methods and callbacks) is especially important, as these custom events can be dispatched or listened to without additional glue code written in a scripting language.
Let’s take a look at two different approaches to scripting, one using JavaScript call backs, and one using events.
To make things concrete, let’s implement a better confirmation dialog
for the DELETE button we created in Alpine in the previous
section. In the original example we used the confirm()
function built in to JavaScript, which shows a pretty bare-bones system
confirmation dialog. We will replace this function with a popular
JavaScript library, SweetAlert2, that shows a much nicer looking
confirmation dialog. Unlike the confirm() function, which
blocks and returns a boolean (true if the user confirmed,
false otherwise), SweetAlert2 returns a
Promise object, which is a JavaScript mechanism for hooking
in a callback once an asynchronous action (such as waiting for a user to
confirm or deny an action) completes.
Integrating using callbacks
With SweetAlert2 installed as a library, you have access to the
Swal object, which has a fire() function on it
to trigger showing an alert. You can pass in arguments to the
fire() method to configure exactly what the buttons on the
confirmation dialog look like, what the title of the dialog is, and so
forth. We won’t get into these details too much, but you will see what a
dialog looks like in a bit.
So, given we have installed the SweetAlert2 library, we can swap it
in place of the confirm() function call. We then need to
restructure the code to pass a callback to the
then() method on the Promise that
Swal.fire() returns. A deep dive into Promises is beyond
the scope of this chapter, but suffice to say that this callback will be
called when a user confirms or denies the action. If the user confirmed
the action, then the result.isConfirmed property will be
true.
Given all that, our updated code will look like this:
<button type="button" class="bad bg color border"
  @click="Swal.fire({ <1>
    title: 'Delete these contacts?', <2>
    showCancelButton: true,
    confirmButtonText: 'Delete'
  }).then((result) => { <3>
    if (result.isConfirmed) htmx.ajax('DELETE', '/contacts',
        { source: $root, target: document.body })
  });"
>Delete</button>
A callback-based confirmation dialog
Invoke the
Swal.fire()functionConfigure the dialog
Handle the result of the user’s selection
And now, when this button is clicked, we get a nice looking dialog in
our web application ([fig-swal-screenshot]) — much nicer than the system
confirmation dialog. Still, this feels a little wrong. This is a lot of
code to write just to trigger a slightly nicer confirm(),
isn’t it? And the htmx JavaScript code we are using here feels awkward.
It would be more natural to move the htmx out to attributes on the
button, as we have been doing, and then trigger the request via
events.
A SweetAlert dialog box
So let’s take a different approach and see how that looks.
Integrating using events
To clean this code up, we will pull the Swal.fire() code
out to a custom JavaScript function we will create called
sweetConfirm(). sweetConfirm() will take the
dialog options that are passed into the fire() method, as
well as the element that is confirming an action. The big difference
here is that the new sweetConfirm() function, rather than
calling some htmx directly, will instead trigger a
confirmed event on the button when the user confirms they
wish to delete.
Here is what our JavaScript function looks like:
function sweetConfirm(elt, config) {
  Swal.fire(config) <1>
    .then((result) => {
      if (result.isConfirmed) {
        elt.dispatchEvent(new Event('confirmed')); <2>
      }
    });
}
An event-based confirmation dialog
Pass the config through to the
fire()function.If the user confirmed the action, trigger a
confirmedevent.
With this method available, we can now tighten up our delete button
quite a bit. We can remove all the SweetAlert2 code that we had in the
@click Alpine attribute, and simply call this new
sweetConfirm() method, passing in the arguments
$el, which is the Alpine syntax for getting “the current
element” that the script is on, and then the exact configuration we want
for our dialog.
If the user confirms the action, a confirmed event will
be triggered on the button. This means that we can go back to using our
trusty htmx attributes! Namely, we can move DELETE to an
hx-delete attribute, and we can use hx-target
to target the body. And then, and here is the crucial step, we can use
the confirmed event that is triggered in the
sweetConfirm() function, to trigger the request, but adding
an hx-trigger for it.
Here is what our code looks like:
<button type="button" class="bad bg color border"
  hx-delete="/contacts" hx-target="body" hx-trigger="confirmed" <1>
  @click="sweetConfirm($el, { <2>
    title: 'Delete these contacts?', <3>
    showCancelButton: true,
    confirmButtonText: 'Delete'
  })">
An Event-based Confirmation Dialog
Our htmx attributes are back.
We pass the button in to the function, so an event can be triggered on it.
We pass through the SweetAlert2 configuration information.
As you can see, this event-based code is much cleaner and certainly
more “HTML-ish.” The key to this cleaner implementation is that our new
sweetConfirm() function fires an event that htmx is able to
listen for.
This is why a rich event model is important to look for when choosing a library to work with, both with htmx and with Hypermedia-Driven Applications in general.
Unfortunately, due to the prevalence and dominance of the JavaScript-first mindset today, many libraries are like SweetAlert2: they expect you to pass a callback in the first style. In these cases you can use the technique we have demonstrated here, wrapping the library in a function that triggers events in a callback, to make the library more hypermedia and htmx-friendly.
Pragmatic Scripting
In case of conflict, consider users over authors over implementors over specifiers over theoretical purity.
— W3C, HTML Design Principles § 3.2 Priority of Constituencies
We have looked at several tools and techniques for scripting in a Hypermedia-Driven Application. How should you pick between them? The sad truth is that there will never be a single, always correct answer to this question.
Are you committed to vanilla JavaScript-only, perhaps due to company policy? Well, you can use vanilla JavaScript effectively to script your Hypermedia-Driven Application.
Do you have more leeway and like the look of Alpine.js? That’s a great way to add more structured, localized JavaScript to your application, and offers some nice reactive features as well.
Are you a bit more bold in your technical choices? Maybe _hyperscript is worth a look. (We certainly think so.)
Sometimes you might even consider picking two (or more) of these approaches within an application. Each has its own strengths and weaknesses, and all of them are relatively small and self-contained, so picking the right tool for the job at hand might be the best approach.
In general, we encourage a pragmatic approach to scripting: whatever feels right is probably right (or, at least, right enough) for you. Rather than being concerned about which particular approach is taken for your scripting, we would focus on these more general concerns:
Avoid communicating with the server via JSON data APIs.
Avoid storing large amounts of state outside of the DOM.
Favor using events, rather than hard-coded callbacks or method calls.
And even on these topics, sometimes a web developer has to do what a web developer has to do. If the perfect widget for your application exists but uses a JSON data API? That’s OK.
Just don’t make it a habit.
HTML Notes: HTML is for Applications
A prevalent meme among developers suggests that HTML was designed for “documents” and is unsuitable for “applications.” In reality, hypermedia is not only a sophisticated, modern architecture for applications, but it can allow us to do away with this artificial app/document split for good.
When I say Hypertext, I mean the simultaneous presentation of information and controls such that the information becomes the affordance through which the user obtains choices and selects actions.
— Roy Fielding, A little REST and Relaxation
HTML allows documents to contain rich multimedia including images, audio, video, JavaScript programs, vector graphics and (with some help) 3D environments. More importantly, however, it allows interactive controls to be embedded within these documents, allowing the information itself to be the app through which it is accessed.
Consider: Is it not mind-boggling that a single application — which works on all types of computers and OSs — can let you read news, place video calls, compose documents, enter virtual worlds, and do almost any other everyday computing task?
Unfortunately, it is the interactive capabilities of HTML that is its least developed aspect. For reasons unknown to us, while HTML made it to version 5 and became a Living Standard, accreting many game-changing features on the way, the data interactions in it are still mainly restricted to links and forms. It’s up to developers to extend HTML, and we want to do so in a way that doesn’t abstract over its simplicity with an imitation of classical “native” toolkits.
Software was not supposed to use native toolkits
Years of windows UI libraries yet no real-world use found for going lower level than the Web
Wanted a window anyway for a laugh? We had a tool for that: It was called “Electron”
“yes I would love to write 4 different copies of the same UI” - Statements dreamed up by the Utterly Deranged
— Leah Clark, @leah@tilde.zone
Rendering here refers to HTML generation. Framework support for server-side rendering is not needed in a HDA because generating HTML on the server is the default.↩︎
Beware that Shadow DOM is a newer web platform feature that’s still in development at the time of writing. In particular, there are some accessibility bugs that may occur when elements inside and outside the shadow root interact.↩︎