Contents
- Picking A “Web Stack”
- Python
- Introducing Flask: Our First Route
- Contact.app Functionality
- HTML Notes: Framework Soup
To start our journey into Hypermedia-Driven Applications, we are going to create a simple contact management web application called Contact.app. We will start with a basic, “Web 1.0-style” Multi-Page Application (MPA), in the grand CRUD (Create, Read, Update, Delete) tradition. It will not be the best contact management application in the world, but it will be simple and it will do its job.
This application will also be easy to incrementally improve in the coming chapters by utilizing the hypermedia-oriented library htmx.
By the time we are finished building and enhancing the application, over the next few chapters, it will have some very slick features that most developers today would assume requires the use of a SPA JavaScript framework.
Picking A “Web Stack”
In order to demonstrate how web 1.0 applications work, we need to pick a server-side language and a library for handling HTTP requests. Colloquially, this is called our “Server-Side” or “Web” stack, and there are literally hundreds of options to choose from, many with passionate followings. You probably have a web framework that you prefer and, while we wish we could write this book for every possible stack out there, in the interest of simplicity (and sanity) we can only pick one.
For this book we are going to use the following stack:
Python as our programming language.
Flask as our web framework, allowing us to connect HTTP requests to Python logic.
Jinja2 for our server-side templating language, allowing us to render HTML responses using a familiar and intuitive syntax.
Why this particular stack?
Python is the most popular programming language in the world, as of this writing, according to the TIOBE index, a respected measure of programming language popularity. More importantly, Python is easy to read even if you aren’t familiar with it.
We chose the Flask web framework because it is simple and does not impose a lot of structure on top of the basics of HTTP request handling.
This bare-bones approach is a good match for our needs: in other cases you might consider a more full-featured Python framework, such as Django, which supplies much more functionality out of the box than Flask does.
By using Flask for our book, we will be able to keep our code focused on hypermedia exchanges.
We picked Jinja2 templates because they are the default templating language for Flask. They are simple enough and similar enough to most other server-side templating languages that most people who are familiar with any server-side (or client-side) templating library should be able to understand them quickly and easily.
Even if this combination of technologies isn’t your preferred stack, please, keep reading: you will learn quite a bit from the patterns we introduce in the coming chapters and it shouldn’t be hard to map them into your preferred language and frameworks.
With this stack we will be rendering HTML on the server-side to return to clients, rather than producing JSON. This is the traditional approach to building web applications. However, with the rise of SPAs, this approach is not as widely used a technique as it once was. Today, as people are rediscovering this style of web applications, the term “Server-Side Rendering” or SSR is emerging as the way that people talk about it. This contrasts with “Client-Side Rendering”, that is, rendering templates in the browser with data retrieved in JSON form from the server, as is common in SPA libraries.
In Contact.app we will intentionally keep things as simple as possible to maximize the teaching value of our code: it won’t be perfectly factored code, but it will be easy to follow for readers, even if they have little Python experience, and it should be easy to translate both the application and the techniques demonstrated into your preferred programming environment.
Python
Since this book is for learning how to use hypermedia effectively, we’ll just briefly introduce the various technologies we use around that hypermedia. This has some obvious drawbacks: if you aren’t comfortable with Python, for example, some example Python code in the book may be a bit confusing or mysterious at first.
If you feel like you need a quick introduction to the language before diving into the code, we recommend the following books and websites:
Python Crash Course from No Starch Press
Learn Python The Hard Way by Zed Shaw
Python For Everybody by Dr. Charles R. Severance
We think most web developers, even developers who are unfamiliar with Python, should be able to follow along with our examples. Most of the authors of this book hadn’t written much Python before writing it, and we got the hang of it pretty quickly.
Introducing Flask: Our First Route
Flask is a simple but flexible web framework for Python. We’ll ease into it by touching on its core elements.
A Flask application consists of a series of routes tied to functions that execute when an HTTP request to a given path is made. It uses a Python feature called “decorators” to declare the route that will be handled, which is then followed by a function to handle requests to that route. We’ll use the term “handler” to refer to the functions associated with a route.
Let’s create our first route definition, a simple “Hello World”
route. In the following Python code you will see the @app
symbol. This is the flask decorator that allows us to set up our routes.
Don’t worry too much about how decorators work in Python, just know that
this feature allows us to map a given path to a particular
function (i.e., handler). The Flask application, when started, will take
HTTP requests and look up the matching handler and invoke it.
@app.route("/") <1>
def index(): <2>
    return "Hello World!" <3>
A simple “Hello World” route
Establishes we are mapping the
/path as a route.The next method is the handler for that route.
Returns the string “Hello World!” to the client.
The route() method on the Flask decorator takes an
argument: the path you wish the route to handle. Here we pass in the
root or / path, as a string, to handle requests to the root
path.
This route declaration is then followed by a simple function
definition, index(). In Python, decorators invoked in this
manner apply to the function immediately following them. Therefore, this
function becomes the “handler” for that route, and will be executed when
an HTTP request to the given path is made.
Note that the name of the function doesn’t matter, we can call it
whatever we’d like so long as it is unique. In this case we chose
index() because that fits with the route we are handling:
the root “index” of the web application.
So we have the index() function immediately following
our route definition for the root, and this will become the handler for
the root URL in our web application.
The handler in this case is dead simple, it just returns a string, “Hello World!”, to the client. This isn’t hypermedia yet, but as we can see in [fig-helloworld], a browser will render it just fine.
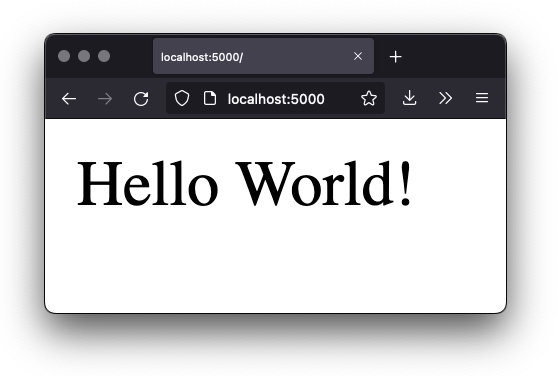
Hello World!
Great, there’s our first step into Flask, showing the core technique we are going to use to respond to HTTP requests: routes mapped to handlers.
For Contact.app, rather than rendering “Hello World!” at the root
path, we are going to do something a little fancy: we are going to
redirect to another path, the /contacts path. Redirects are
a feature of HTTP that allow you to redirect a client to another
location with an HTTP response.
We are going to display a list of contacts as our root page, and,
arguably, redirecting to the /contacts path to display this
information is a bit more consistent with the notion of resources with
REST. This is a judgement call on our part, and not something we feel is
too important, but it makes sense in terms of routes we will set up
later in the application.
To change our “Hello World” route to a redirect, we only need to change one line of code:
@app.route("/")
def index():
    return redirect("/contacts") <1>
Changing “Hello World” to a redirect
Update to a call to
redirect()
Now the index() function returns the result of the
Flask-supplied redirect() function with the path we’ve
supplied. In this case the path is /contacts, passed in as
a string argument. Now, if you navigate to the root path,
/, our Flask application will forward you on to the
/contacts path.
Contact.app Functionality
Now that we have some understanding of how to define routes, let’s get down to specifying and then implementing our web application.
What will Contact.app do?
Initially, it will allow users to:
View a list of contacts, including first name, last name, phone and email address
Search the contacts
Add a new contact
View the details of a contact
Edit the details of a contact
Delete a contact
So, as you can see, Contact.app is a CRUD application, the sort of application that is perfect for an old-school web 1.0 approach.
Note that the source code of Contact.app is available on GitHub.
Showing A Searchable List Of Contacts
Let’s add our first real bit of functionality: the ability to show all the contacts in our app in a list (really, in a table).
This functionality is going to be found at the /contacts
path, which is the path our previous route is redirecting to.
We will use Flask to route the /contacts path to a
handler function, contacts(). This function will do one of
two things:
If there is a search term found in the request, it will filter down to only contacts matching that term
If not, it will simply list all contacts
This is a common approach in web 1.0 style applications: the same URL that displays all instances of some resource also serves as the search results page for those resources. Taking this approach makes it easy to reuse the list display that is common to both types of request.
Here is what the code looks like for this handler:
@app.route("/contacts")
def contacts():
    search = request.args.get("q") <1>
    if search is not None:
        contacts_set = Contact.search(search) <2>
    else:
        contacts_set = Contact.all() <3>
    return render_template("index.html", contacts=contacts_set)
A handler for server-side search
Look for the query parameter named
q, which stands for “query.”If the parameter exists, call the
Contact.search()function with it.If not, call the
Contact.all()function.Pass the result to the
index.htmltemplate to render to the client.
We see the same sort of routing code we saw in our first example, but
we have a more elaborate handler function. First, we check to see if a
search query parameter named q is part of the request.
- Query Strings
-
A “query string” is part of the URL specification. Here is an example URL with a query string in it:
https://example.com/contacts?q=joe. The query string is everything after the?, and has a name-value pair format. In this URL, the query parameterqis set to the string valuejoe. In plain HTML, a query string can be included in a request either by being hardcoded in an anchor tag or, more dynamically, by using a form tag with aGETrequest.
To return to our Flask route, if a query parameter named
q is found, we call out to the search() method
on a Contact model object to do the actual contact search
and return all the matching contacts.
If the query parameter is not found, we simply get all
contacts by invoking the all() method on the
Contact object.
Finally, we render a template, index.html that displays
the given contacts, passing in the results of whichever of these two
functions we end up calling.
The list & search templates
Now that we have our handler logic written, we’ll create a template to render HTML in our response to the client. At a high level, our HTML response needs to have the following elements:
A list of any matching or all contacts.
A search box where a user may type and submit search terms.
A bit of surrounding “chrome”: a header and footer for the website that will be the same regardless of the page you are on.
We are using the Jinja2 templating language, which has the following features:
We can use double-curly braces,
{{ }}, to embed expression values in the template.we can use curly-percents,
{% %}, for directives, like iteration or including other content.
Beyond this basic syntax, Jinja2 is very similar to other templating languages used to generate content, and should be easy to follow for most web developers.
Let’s look at the first few lines of code in the
index.html template:
{% extends 'layout.html' %} <1>

{% block content %} <2>

  <form action="/contacts" method="get" class="tool-bar"> <3>
    <label for="search">Search Term</label>
    <input id="search" type="search" name="q"
      value="{{ request.args.get('q') or '' }}" /> <4>
    <input type="submit" value="Search"/>
  </form>
Start of index.html
Set the layout template for this template.
Delimit the content to be inserted into the layout.
Create a search form that will issue an HTTP
GETto/contacts.Create an input for a user to type search queries.
The first line of code references a base template,
layout.html, with the extends directive. This
layout template provides the layout for the page (again, sometimes
called “the chrome”): it wraps the template content in an
<html> tag, imports any necessary CSS and JavaScript
in a <head> element, places a
<body> tag around the main content and so forth. All
the common content wrapped around the “normal” content for the entire
application is located in this file.
The next line of code declares the content section of
this template. This content block is used by the
layout.html template to inject the content of
index.html within its HTML.
Next we have our first bit of actual HTML, rather than just Jinja
directives. We have a simple HTML form that allows you to search
contacts by issuing a GET request to the
/contacts path. The form itself contains a label and an
input with the name “q.” This input’s value will be submitted with the
GET request to the /contacts path, as a query
string (since this is a GET request.)
Note that the value of this input is set to the Jinja expression
{{ request.args.get('q') or '' }}. This expression is
evaluated by Jinja and will insert the request value of “q” as the
input’s value, if it exists. This will “preserve” the search value when
a user does a search, so that when the results of a search are rendered
the text input contains the term that was searched for. This makes for a
better user experience since the user can see exactly what the current
results match, rather than having a blank text box at the top of the
screen.
Finally, we have a submit-type input. This will render as a button and, when it is clicked, it will trigger the form to issue an HTTP request.
This search interface forms the top of our contact page. Following it is a table of contacts, either all contacts or the contacts that match the search, if a search was done.
Here is what the template code for the contact table looks like:
<table>
  <thead>
  <tr>
    <th>First <th>Last <th>Phone <th>Email <th/> <1>
  </tr>
  </thead>
  <tbody>
  {% for contact in contacts %} <2>
    <tr>
      <td>{{ contact.first }}</td>
      <td>{{ contact.last }}</td>
      <td>{{ contact.phone }}</td>
      <td>{{ contact.email }}</td> <3>
      <td><a href="/contacts/{{ contact.id }}/edit">Edit</a>
        <a href="/contacts/{{ contact.id }}">View</a></td> <4>
    </tr>
  {% endfor %}
  </tbody>
</table>
The contacts table
Output some headers for our table.
Iterate over the contacts that were passed in to the template.
Output the values of the current contact, first name, last name, etc.
An “operations” column, with links to edit or view the contact details.
This is the core of the page: we construct a table with appropriate
headers matching the data we are going to show for each contact. We
iterate over the contacts that were passed into the template by the
handler method using the for loop directive in Jinja2. We
then construct a series of rows, one for each contact, where we render
the first and last name, phone and email of the contact as table cells
in the row.
Additionally, we have a table cell that includes two links:
A link to the “Edit” page for the contact, located at
/contacts/{{ contact.id }}/edit(e.g., For the contact with id 42, the edit link will point to/contacts/42/edit)A link to the “View” page for the contact
/contacts/{{ contact.id }}(using our previous contact example, the view page would be at/contacts/42)
Finally, we have a bit of end-matter: a link to add a new contact and
a Jinja2 directive to end the content block:
<p>
    <a href="/contacts/new">Add Contact</a> <1>
  </p>

{% endblock %} <2>
The “add contact” link
Link to the page that allows you to create a new contact.
The closing element of the
contentblock.
And that’s our complete template. Using this simple server-side template, in combination with our handler method, we can respond with an HTML representation of all the contacts requested. So far, so hypermedia.
[fig-contactapp] is what the template looks like, rendered with a bit of contact information.
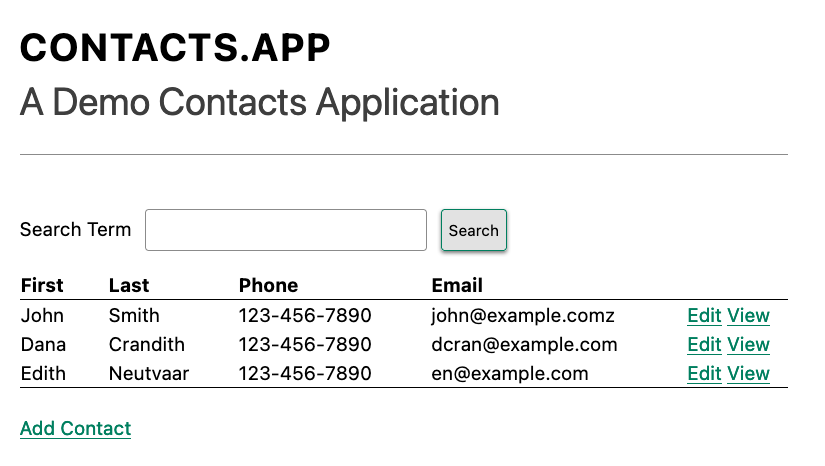
Contact.app
Now, our application won’t win any design awards at this point, but notice that our template, when rendered, provides all the functionality necessary to see all the contacts and search them, and also provides links to edit them, view details of them or even create a new one.
And it does all this without the client (that is, the browser) knowing a thing about what contacts are or how to work with them. Everything is encoded in the hypermedia. A web browser accessing this application just knows how to issue HTTP requests and then render HTML, nothing more about the specifics of our applications end points or underlying domain model.
As simple as our application is at this point, it is thoroughly RESTful.
Adding A New Contact
The next bit of functionality that we will add to our application is
the ability to add new contacts. To do this, we are going to need to
handle that /contacts/new URL referenced in the “Add
Contact” link above. Note that when a user clicks on that link, the
browser will issue a GET request to the
/contacts/new URL.
All the other routes we have so far use GET as well, but
we are actually going to use two different HTTP methods for this bit of
functionality: an HTTP GET to render a form for adding a
new contact, and then an HTTP POST to the same
path to actually create the contact, so we are going to be explicit
about the HTTP method we want to handle when we declare this route.
Here is the code:
@app.route("/contacts/new", methods=['GET']) <1>
def contacts_new_get():
    return render_template("new.html", contact=Contact()) <2>
The “new contact” GET route
Declare a route, explicitly handling
GETrequests to this path.Render the
new.htmltemplate, passing in a new contact object.
Simple enough. We just render a new.html template with a
new Contact. (Contact() is how you construct a new instance
of the Contact class in Python, if you aren’t familiar with
it.)
While the handler code for this route is very simple, the
new.html template is more complicated.
For the remaining templates we are going to omit the layout directive and the content block declaration, but you can assume they are the same unless we say otherwise. This will let us focus on the “meat” of the template.
If you are familiar with HTML you are probably expecting a form element here, and you will not be disappointed. We are going to use the standard form hypermedia control for collecting contact information and submitting it to the server.
Here is what our HTML looks like:
<form action="/contacts/new" method="post"> <1>
  <fieldset>
    <legend>Contact Values</legend>
    <p>
      <label for="email">Email</label> <2>
      <input name="email" id="email"
        type="email" placeholder="Email"
        value="{{ contact.email or '' }}"> <3>
      <span class="error">
        {{ contact.errors['email'] }} <4>
      </span>
    </p>
The “new contact” form
A form that submits to the
/contacts/newpath, using an HTTPPOST.A label for the first form input.
The first form input, of type email.
Any error messages associated with this field.
In the first line of code we create a form that will submit back
to the same path that we are handling:
/contacts/new. Rather than issuing an HTTP GET
to this path, however, we will issue an HTTP POST to it.
Using a POST in this manner will signal to the server that
we want to create a new Contact, rather than get a form for creating
one.
We then have a label (always a good practice!) and an input that
captures the email of the contact being created. The name of the input
is email and, when this form is submitted, the value of
this input will be submitted in the POST request,
associated with the email key.
Next we have inputs for the other fields for contacts:
<p>
  <label for="first_name">First Name</label>
  <input name="first_name" id="first_name" type="text"
    placeholder="First Name" value="{{ contact.first or '' }}">
  <span class="error">{{ contact.errors['first'] }}</span>
</p>
<p>
  <label for="last_name">Last Name</label>
  <input name="last_name" id="last_name" type="text"
    placeholder="Last Name" value="{{ contact.last or '' }}">
  <span class="error">{{ contact.errors['last'] }}</span>
</p>
<p>
  <label for="phone">Phone</label>
  <input name="phone" id="phone" type="text" placeholder="Phone"
    value="{{ contact.phone or '' }}">
  <span class="error">{{ contact.errors['phone'] }}</span>
</p>
Inputs and labels for the “new contact” form
Finally, we have a button that will submit the form, the end of the form tag, and a link back to the main contacts table:
<button>Save</button>
  </fieldset>
</form>

<p>
  <a href="/contacts">Back</a>
</p>
The submit button for the “new contact” form
It is easy to miss in this straight-forward example: we are seeing the flexibility of hypermedia in action.
If we add a new field, remove a field, or change the logic around how fields are validated or work with one another, this new state of affairs would be reflected in the new hypermedia representation given to users. A user would see the updated new form and be able to work with these new features, with no software update required.
Handling the post to /contacts/new
The next step in our application is to handle the POST
that this form makes to /contacts/new.
To do so, we need to add another route to our application that
handles the /contacts/new path. The new route will handle
an HTTP POST method instead of an HTTP GET. We
will use the submitted form values to attempt to create a new
Contact.
If we are successful in creating a Contact, we will redirect the user to the list of contacts and show a success message. If we aren’t successful, then we will render the new contact form again with whatever values the user entered and render error messages about what issues need to be fixed so that the user can correct them.
Here is our new request handler:
@app.route("/contacts/new", methods=['POST'])
def contacts_new():
    c = Contact(
      None,
      request.form['first_name'],
      request.form['last_name'],
      request.form['phone'],
      request.form['email']) <1>
    if c.save(): <2>
        flash("Created New Contact!")
        return redirect("/contacts") <3>
    else:
        return render_template("new.html", contact=c) <4>
The “new contact” controller code
We construct a new contact object with the values from the form.
We try to save it.
On success, “flash” a success message & redirect to the
/contactspage.On failure, re-render the form, showing any errors to the user.
The logic in this handler is a bit more complex than other methods we
have seen. The first thing we do is create a new Contact, again using
the Contact() syntax in Python to construct the object. We
pass in the values that the user submitted in the form by using the
request.form object, a feature provided by Flask.
This request.form allows us to access submitted form
values in an easy and convenient way, by simply passing in the same name
associated with the various inputs.
We also pass in None as the first value to the
Contact constructor. This is the “id” parameter, and by
passing in None we are signaling that it is a new contact,
and needs to have an ID generated for it. (Again, we are not going into
the details of how this model object is implemented, our only concern is
using it to generate hypermedia responses.)
Next, we call the save() method on the Contact object.
This method returns true if the save is successful, and
false if the save is unsuccessful (for example, a bad email
was submitted by the user).
If we are able to save the contact (that is, there were no validation errors), we create a flash message indicating success, and redirect the browser back to the list page. A “flash” is a common feature in web frameworks that allows you to store a message that will be available on the next request, typically in a cookie or in a session store.
Finally, if we are unable to save the contact, we re-render the
new.html template with the contact. This will show the same
template as above, but the inputs will be filled in with the submitted
values, and any errors associated with the fields will be rendered to
feedback to the user as to what validation failed.
OK, so we have our server-side logic set up to save contacts. And, believe it or not, this is about as complicated as our handler logic will get, even when we look at adding more sophisticated htmx-driven behaviors.
Viewing The Details Of A Contact
The next piece of functionality we will implement is the detail page
for a Contact. The user will navigate to this page by clicking the
“View” link in one of the rows in the list of contacts. This will take
them to the path /contacts/<contact id> (e.g.,
/contacts/42).
This is a common pattern in web development: contacts are treated as resources and the URLs around these resources are organized in a coherent manner.
If you wish to view all contacts, you issue a
GETto/contacts.If you want a hypermedia representation allowing you to create a new contact, you issue a
GETto/contacts/new.If you wish to view a specific contact (with, say, an id of
42), you issue a `GETto/contacts/42.
Our handler logic for the detail route is going to be very simple: we just look the Contact up by id, which is embedded in the path of the URL for the route. To extract this ID we are going to need to introduce a final bit of Flask functionality: the ability to call out pieces of a path and have them automatically extracted and passed in to a handler function.
Here is what the code looks like, just a few lines of simple Python:
@app.route("/contacts/<contact_id>") <1>
def contacts_view(contact_id=0): <2>
    contact = Contact.find(contact_id) <3>
    return render_template("show.html", contact=contact) <4>
Map the path, with a path variable named
contact_id.The handler takes the value of this path parameter.
Look up the corresponding contact.
Render the
show.htmltemplate.
You can see the syntax for extracting values from the path in the
first line of code: you enclose the part of the path you wish to extract
in <> and give it a name. This component of the path
will be extracted and then passed into the handler function, via the
parameter with the same name.
So, if you were to navigate to the path /contacts/42,
the value 42 would be passed into the
contacts_view() function for the value of
contact_id.
Once we have the id of the contact we want to look up, we load it up
using the find method on the Contact object.
We then pass this contact into the show.html template and
render a response.
The Contact Detail Template
Our show.html template is relatively simple, just
showing the same information as the table but in a slightly different
format (perhaps for printing). If we add functionality like “notes” to
the application later on, this will give us a good place to do so.
Again, we will omit the “chrome” of the template and focus on the meat:
<h1>{{contact.first}} {{contact.last}}</h1>

<div>
  <div>Phone: {{contact.phone}}</div>
  <div>Email: {{contact.email}}</div>
</div>

<p>
  <a href="/contacts/{{contact.id}}/edit">Edit</a>
  <a href="/contacts">Back</a>
</p>
The “contact details” template
We simply render a First Name and Last Name header, with the additional contact information below it, and a couple of links: a link to edit the contact and a link to navigate back to the full list of contacts.
Editing And Deleting A Contact
Next up we will tackle the functionality on the other end of that
“Edit” link. Editing a contact is going to look very similar to creating
a new contact. As with adding a new contact, we are going to need two
routes that handle the same path, but using different HTTP methods: a
GET to /contacts/<contact_id>/edit will
return a form allowing you to edit the contact and a POST
to that path will update it.
We are also going to piggyback the ability to delete a contact along
with this editing functionality. To do this we will need to handle a
POST to
/contacts/<contact_id>/delete.
Let’s look at the code to handle the GET, which, again,
will return an HTML representation of an editing interface for the given
resource:
@app.route("/contacts/<contact_id>/edit", methods=["GET"])
def contacts_edit_get(contact_id=0):
    contact = Contact.find(contact_id)
    return render_template("edit.html", contact=contact)
The “edit contact” controller code
As you can see this looks a lot like our “Show Contact”
functionality. In fact, it is nearly identical except for the template:
here we render edit.html rather than
show.html.
While our handler code looked similar to the “Show Contact”
functionality, the edit.html template is going to look very
similar to the template for the “New Contact” functionality: we will
have a form that submits updated contact values to the same “edit” URL
and that presents all the fields of a contact as inputs for editing,
along with any error messages.
Here is the first bit of the form:
<form action="/contacts/{{ contact.id }}/edit" method="post"> <1>
  <fieldset>
    <legend>Contact Values</legend>
    <p>
      <label for="email">Email</label>
      <input name="email" id="email" type="text"
        placeholder="Email" value="{{ contact.email }}"> <2>
      <span class="error">{{ contact.errors['email'] }}</span>
    </p>
The “edit contact” form start
Issue a
POSTto the/contacts/{{ contact.id }}/editpath.As with the
new.htmlpage, the input is tied to the contact’s email.
This HTML is nearly identical to our new.html form,
except that this form is going to submit a POST to a
different path, based on the id of the contact that we want to update.
(It’s worth mentioning here that, rather than POST, we
would prefer to use a PUT or PATCH, but those
are not available in plain HTML.)
Following this we have the remainder of our form, again very similar
to the new.html template, and our button to submit the
form.
<p>
      <label for="first_name">First Name</label>
      <input name="first_name" id="first_name" type="text"
        placeholder="First Name" value="{{ contact.first }}">
      <span class="error">{{ contact.errors['first'] }}</span>
    </p>
    <p>
      <label for="last_name">Last Name</label>
      <input name="last_name" id="last_name" type="text"
        placeholder="Last Name" value="{{ contact.last }}">
      <span class="error">{{ contact.errors['last'] }}</span>
    </p>
    <p>
      <label for="phone">Phone</label>
      <input name="phone" id="phone" type="text"
        placeholder="Phone" value="{{ contact.phone }}">
      <span class="error">{{ contact.errors['phone'] }}</span>
    </p>
    <button>Save</button>
  </fieldset>
</form>
The “edit contact” form body
In the final part of our template we have a small difference between
the new.html and edit.html. Below the main
editing form, we include a second form that allows you to delete a
contact. It does this by issuing a POST to the
/contacts/<contact id>/delete path. Just as we would
prefer to use a PUT to update a contact, we would much
rather use an HTTP DELETE request to delete one.
Unfortunately that also isn’t possible in plain HTML.
To finish up the page, there is a simple hyperlink back to the list of contacts.
<form action="/contacts/{{ contact.id }}/delete" method="post">
  <button>Delete Contact</button>
</form>

<p>
  <a href="/contacts/">Back</a>
</p>
The “edit contact” form footer
Given all the similarities between the new.html and
edit.html templates, you may be wondering why we are not
refactoring these two templates to share logic between them.
That’s a good observation and, in a production system, we would probably
do just that.
For our purposes, however, since our application is small and simple, we will leave the templates separate.
Handling the post to /contacts/<contact_id>/edit
Next we need to handle the HTTP POST request that the
form in our edit.html template submits. We will declare
another route that handles the same path as the GET
above.
Here is the new handler code:
@app.route("/contacts/<contact_id>/edit", methods=["POST"]) <1>
def contacts_edit_post(contact_id=0):
    c = Contact.find(contact_id) <2>
    c.update(
      request.form['first_name'],
      request.form['last_name'],
      request.form['phone'],
      request.form['email']) <3>
    if c.save(): <4>
        flash("Updated Contact!")
        return redirect("/contacts/" + str(contact_id)) <5>
    else:
        return render_template("edit.html", contact=c) <6>
Handle a
POSTto/contacts/<contact_id>/edit.Look the contact up by id.
Update the contact with the new information from the form.
Attempt to save it.
On success, flash a success message & redirect to the detail page.
On failure, re-render the edit template, showing any errors.
The logic in this handler is very similar to the logic in the handler
for adding a new contact. The only real difference is that, rather than
creating a new Contact, we look the contact up by id and then call the
update() method on it with the values that were entered in
the form.
Once again, this consistency between our CRUD operations is one of the nice and simplifying aspects of traditional CRUD web applications.
Deleting A Contact
We piggybacked contact delete functionality into the same template
used to edit a contact. This second form will issue an HTTP
POST to /contacts/<contact_id>/delete,
and we will need to create a handler for that path as well.
Here is what the controller looks like:
@app.route("/contacts/<contact_id>/delete", methods=["POST"]) <3>
def contacts_delete(contact_id=0):
    contact = Contact.find(contact_id)
    contact.delete() <2>
    flash("Deleted Contact!")
    return redirect("/contacts") <3>
The “delete contact” controller code
Handle a
POSTthe/contacts/<contact_id>/deletepath.Look up and then invoke the
delete()method on the contact.Flash a success message and redirect to the main list of contacts.
The handler code is very simple since we don’t need to do any
validation or conditional logic: we simply look up the contact the same
way we have been doing in our other handlers and invoke the
delete() method on it, then redirect back to the list of
contacts with a success flash message.
No need for a template in this case, the contact is gone.
Contact.app… Implemented!
And, well… believe it or not, that’s our entire contact application!
If you’ve struggled with parts of the code so far, don’t worry: we don’t expect you to be a Python or Flask expert (we aren’t!). You just need a basic understanding of how they work to benefit from the remainder of the book.
This is a small and simple application, but it does demonstrate many of the aspects of traditional, web 1.0 applications: CRUD, the Post/Redirect/Get pattern, working with domain logic in a controller, organizing our URLs in a coherent, resource-oriented manner.
And, furthermore, this is a deeply Hypermedia-Driven web application. Without thinking about it very much, we have been using REST, HATEOAS and all the other hypermedia concepts we discussed earlier. We would bet that this simple little contact app of ours is more RESTful than 99% of all JSON APIs ever built!
Just by virtue of using a hypermedia, HTML, we naturally fall into the RESTful network architecture.
So that’s great. But what’s the matter with this little web app? Why not end here and go off to develop web 1.0 style applications?
Well, at some level, nothing is wrong with it. Particularly for an application as simple as this one, the older way of building web apps might be a perfectly acceptable approach.
However, our application does suffer from that “clunkiness” that we mentioned earlier when discussing web 1.0 applications: every request replaces the entire screen, introducing a noticeable flicker when navigating between pages. You lose your scroll state. You have to click around a bit more than you might in a more sophisticated web application.
Contact.app, at this point, just doesn’t feel like a “modern” web application.
Is it time to reach for a JavaScript framework and JSON APIs to make our contact application more interactive?
No. No it isn’t.
It turns out that we can improve the user experience of this application while retaining its fundamental hypermedia architecture.
In the next few chapters we will look at htmx, a hypermedia-oriented library that will let us improve our contact application while retaining the hypermedia-based approach we have used so far.
HTML Notes: Framework Soup
Components encapsulate a section of a page along with its dynamic behavior. While encapsulating behavior is a good way to organize code, it can also separate elements from their surrounding context, which can lead to wrong or inadequate relationships between elements. The result is what one might call component soup, where information is hidden in component state, rather than being present in the HTML, which is now incomprehensible due to missing context.
Before you reach for components for reuse, consider your options. Lower-level mechanisms often (allow you to) produce better HTML. In some cases, components can actually improve the clarity of your HTML.
The fact that the HTML document is something that you barely touch, because everything you need in there will be injected via JavaScript, puts the document and the page structure out of focus.
— Manuel Matuzović, Why I’m not the biggest fan of Single Page Applications
In order to avoid <div> soup (or Markdown soup, or
Component soup), you need to be aware of the markup you’re producing and
be able to change it.
Some SPA frameworks, and some web components, make this more difficult by putting layers of abstraction between the code the developer writes and the generated markup.
While these abstractions can allow developers to create richer UI or work faster, their pervasiveness means that developers can lose sight of the actual HTML (and JavaScript) being sent to clients. Without diligent testing, this leads to inaccessibility, poor SEO, and bloat.