  <head>
    <script src="/js/htmx.js"></script>
    ...
</head>Now that we’ve seen how htmx extends HTML as a hypermedia, it’s time to put it into action. As we use htmx, we will still be using hypermedia: we will issue HTTP requests and get back HTML. But, with the additional functionality that htmx provides, we will have a more powerful hypermedia to work with, allowing us to accomplish much more sophisticated interfaces.
This will allow us to address user experience issues, such as long feedback cycles or painful page refreshes, without needing to write much, if any, JavaScript, and without creating a JSON API. Everything will be implemented in hypermedia, using the core hypermedia concepts of the early web.
Installing Htmx
The first thing we need to do is install htmx in our web application. We are going to do this by downloading the
source and saving it locally in our application, so we aren’t dependent on any external systems. This is known as “vendoring”
the library. We can grab the latest version of htmx by navigating our browser to https://unpkg.com/htmx.org, which will
redirect us to the source of the latest version of the library.
We can save the content from this URL into the static/js/htmx.js file in our project.
You can, of course, use a more sophisticated JavaScript package manager such as Node Package Manager (NPM) or yarn to install
htmx. You do this by referring to its package name, htmx.org, in the manner appropriate for your tool. However,
htmx is very small (approximately 12kb when compressed and zipped) and is dependency free, so using it does not require
an elaborate mechanism or build tool.
With htmx downloaded locally to our applications /static/js directory, we can now load it in to our application.
We do this by adding the following script tag to the head tag in our layout.html file, which will make htmx
available and active on every page in our application:
Recall that the layout.html file is a layout file included in most templates that wraps the content of those templates
in common HTML, including a head element that we are using here to install htmx.
Believe it or not, that’s it! This simple script tag will make htmx’s functionality available across our entire application.
AJAX-ifying Our Application
To get our feet wet with htmx, the first feature we are going to take advantage of is known as “boosting.” This is
a bit of a “magic” feature in that we don’t need to do much beyond adding a single attribute, hx-boost, to the
application.
When you put hx-boost on a given element with the value true, it will “boost” all anchor and form elements within that
element. “Boost”, here, means that htmx will convert all those anchors and forms from “normal” hypermedia controls
into AJAX-powered hypermedia controls. Rather than issuing “normal” HTTP requests that replace the whole page, the links
and forms will issue AJAX requests. Htmx then swaps the inner content of the <body> tag in the response to these
requests into the existing pages <body> tag.
This makes navigation feel faster because the browser will not be re-interpreting most of the tags in the response
<head> and so forth.
Boosted Links
Let’s take a look at an example of a boosted link. Below is a link to a hypothetical settings page for a web application.
Because it has hx-boost="true" on it, htmx will halt the normal link behavior of issuing a request to the /settings path and replacing
the entire page with the response. Instead, htmx will issue an AJAX request to /settings, take the result and replace
the body element with the new content.
<a href="/settings" hx-boost="true">Settings</a> (1)-
The
hx-boostattribute makes this link AJAX-powered.
You might reasonably ask: what’s the advantage here? We are issuing an AJAX request and simply replacing the entire body.
Is that significantly different from just issuing a normal link request?
Yes, it is in fact different: with a boosted link, the browser is able to avoid any processing associated with the head tag. The head tag often contains many scripts and CSS file references. In the boosted scenario, it is not necessary to re-process those resources: the scripts and styles have already been processed and will continue to apply to the new content. This can often be a very easy way to speed up your hypermedia application.
A second question you might have is: does the response need to be formatted specially to work with hx-boost? After all,
the settings page would normally render an html tag, with a head tag and so forth. Do you need to handle “boosted”
requests specially?
The answer is no: htmx is smart enough to pull out only the content of the body tag to swap in to the new page.
The head tag is mostly ignored: only the title tag, if it is present, will be processed. This means you don’t need to
do anything special on the server side to render templates that hx-boost can handle: just return the normal HTML for
your page, and it should work fine.
Note that boosted links (and forms) will also continue to update the navigation bar and history, just like normal links, so users will be able to use the browser back button, will be able to copy and paste URLs (or “deep links”) and so on. Links will act pretty much like “normal”, they will just be faster.
Boosted Forms
Boosted form tags work in a similar way to boosted anchor tags: a boosted form will use an AJAX request rather than the usual browser-issued request, and will replace the entire body with the response.
Here is an example of a form that posts messages to the /messages endpoint using an HTTP POST request. By adding
hx-boost to it, those requests will be done in AJAX, rather than the normal browser behavior.
<form action="/messages" method="post" hx-boost="true">(1)
  <input type="text" name="message" placeholder="Enter A Message...">
  <button>Post Your Message</button>
</form>-
As with the link,
hx-boostmakes this form AJAX-powered.
A big advantage of the AJAX-based request that hx-boost uses (and the lack of head processing that occurs) is that it
avoids what is known as a flash of unstyled content:
- Flash Of Unstyled Content (FOUC)
-
A situation where a browser renders a web page before all the styling information is available for the page. A FOUC causes a disconcerting momentary “flash” of the unstyled content, which is then restyled when all the style information is available. You will notice this as a flicker when you move around the internet: text, images and other content can “jump around” on the page as styles are applied to it.
With hx-boost the site’s styling is already loaded before the new content is retrieved, so there is no such flash of
unstyled content. This can make a “boosted” application feel both smoother and also snappier in general.
Attribute Inheritance
Let’s expand on our previous example of a boosted link, and add a few more boosted links alongside it. We’ll add links
so that we have one to the /contacts page, the /settings page, and the /help page. All these
links are boosted and will behave in the manner that we have described above.
This feels a little redundant, doesn’t it? It seems silly to annotate all three links with the hx-boost="true" attribute
right next to one another.
<a href="/contacts" hx-boost="true">Contacts</a>
<a href="/settings" hx-boost="true">Settings</a>
<a href="/help" hx-boost="true">Help</a>
Htmx offers a feature to help reduce this redundancy: attribute inheritance. With most attributes in htmx, if you place it on a parent, the attribute will also apply to children elements. This is how Cascading Style Sheets work, and that idea inspired htmx to adopt a similar “cascading htmx attributes” feature.
To avoid the redundancy in this example, let’s introduce a div element that encloses all the links and then “hoist” the
hx-boost attribute up to that parent div. This will let us remove the redundant hx-boost attributes but ensure all the links are
still boosted, inheriting that functionality from the parent div.
Note that any legal HTML element could be used here, we just use a div out of habit.
<div hx-boost="true"> (1)
    <a href="/contacts">Contacts</a>
    <a href="/settings">Settings</a>
    <a href="/help">Help</a>
</div>-
The
hx-boosthas been moved to the parent div.
Now we don’t have to put an hx-boost="true" on every link and, in fact, we can add more links alongside the
existing ones, and they, too, will be boosted, without us needing to explicitly annotate them.
That’s fine, but what if you have a link that you don’t want boosted within an element that has hx-boost="true" on
it? A good example of this situation is when a link is to a resource to be downloaded, such as a PDF. Downloading a
file can’t be handled well by an AJAX request, so you probably want that link to behave “normally”, issuing a full
page request for the PDF, which the browser will then offer to save as a file on the user’s local system.
To handle this situation, you simply override the parent hx-boost value with hx-boost="false" on the
anchor tag that you don’t want to boost:
<div hx-boost="true"> (1)
    <a href="/contacts">Contacts</a>
    <a href="/settings">Settings</a>
    <a href="/help">Help</a>
    <a href="/help/documentation.pdf" hx-boost="false">Download Docs</a> (2)
</div>-
The
hx-boostis still on the parent div. - The boosting behavior is overridden for this link.
Here we have a new link to a documentation PDF that we wish to function like a regular link. We have added
hx-boost="false" to the link and this declaration will override the hx-boost="true" on the parent div, reverting
it to regular link behavior and, thus, allowing for the file download behavior that we want.
Progressive Enhancement
A nice aspect of hx-boost is that it is an example of progressive enhancement:
- Progressive Enhancement
-
A software design philosophy that aims to provide as much essential content and functionality to as many users as possible, while delivering a better experience to users with more advanced web browsers.
Consider the links in the example above. What would happen if someone did not have JavaScript enabled?
No problem. The application would continue to work, but it would issue regular HTTP requests, rather than AJAX-based HTTP requests. This means that your web application will work for the maximum number of users; those with modern browsers (or users who have not turned off JavaScript) can take advantage of the benefits of the AJAX-style navigation that htmx offers, and others can still use the app just fine.
Compare the behavior of htmx’s hx-boost attribute with a JavaScript heavy Single Page Application: such an application
often won’t function at all without JavaScript enabled. It is often very difficult to adopt a progressive enhancement
approach when you use an SPA framework.
This is not to say that every htmx feature offers progressive enhancement. It is certainly possible to build features that do not offer a “No JS” fallback in htmx, and, in fact, many of the features we will build later in the book will fall into this category. We will note when a feature is progressive enhancement friendly and when it is not.
Ultimately, it is up to you, the developer, to decide if the trade-offs of progressive enhancement (a more basic UX, limited improvements over plain HTML) are worth the benefits for your application users.
Adding “hx-boost” to Contact.app
For the contact app we are building, we want this htmx “boost” behavior… well, everywhere.
Right? Why not?
How could we accomplish that?
Well, it’s easy (and pretty common in htmx-powered web applications): we can just add hx-boost on the
body tag of our layout.html template, and we are done.
<html>
...
<body hx-boost="true">(1)
...
</body>
</html>- All links and forms will be boosted now!
Now every link and form in our application will use AJAX by default, making it feel much snappier. Consider the “New Contact” link that we created on the main page:
<a href="/contacts/new">Add Contact</a>Even though we haven’t touched anything on this link or on the server-side handling of the URL it targets, it will now “just work” as a boosted link, using AJAX for a snappier user experience, including updating history, back button support and so on. And, if JavaScript isn’t enabled, it will fall back to the normal link behavior.
All this with one htmx attribute.
The hx-boost attribute is neat, but is different than other htmx attributes in that it is pretty “magical”: by
making one small change you modify the behavior of a large number of elements on the page, turning them into
AJAX-powered elements. Most other htmx attributes are generally lower level and require more explicit annotations in
order to specify exactly what you want htmx to do. In general, this is the design philosophy of htmx: prefer explicit
over implicit and obvious over “magic.”
However, the hx-boost attribute was too useful to allow dogma to override practicality, and so it is included as a
feature in the library.
A Second Step: Deleting Contacts With HTTP DELETE
For our next step with htmx, recall that Contact.app has a small form on the edit page of a contact that is used to delete the contact:
    <form action="/contacts/{{ contact.id }}/delete" method="post">
        <button>Delete Contact</button>
    </form>
This form issued an HTTP POST to, for example, /contacts/42/delete, in order to delete the contact with the ID 42.
We mentioned previously that one of the annoying things about HTML is that you can’t issue an HTTP DELETE
(or PUT or PATCH) request directly, even though these are all part of HTTP and HTTP is obviously designed for
transferring HTML.
Thankfully, now, with htmx, we have a chance to rectify this situation.
The “right thing,” from a RESTful, resource-oriented perspective is, rather than issuing an HTTP POST to
/contacts/42/delete, to issue an HTTP DELETE to /contacts/42. We want to delete the contact. The contact is
a resource. The URL for that resource is /contacts/42. So the ideal is a DELETE request to /contacts/42/.
Let’s update our application to do this by adding the htmx hx-delete attribute to the “Delete Contact” button:
<button hx-delete="/contacts/{{ contact.id }}">Delete Contact</button>Now, when a user clicks this button, htmx will issue an HTTP DELETE request via AJAX to the URL for the contact
in question.
A couple of things to notice:
-
We no longer need a
formtag to wrap the button, because the button itself carries the hypermedia action that it performs directly on itself. -
We no longer need to use the somewhat awkward
"/contacts/{{ contact.id }}/delete"route, but can simply use the"/contacts/{{ contact.id }}route, since we are issuing aDELETE. By using aDELETEwe disambiguate between a request intended to update the contact and a request intended to delete it, using the native HTTP tools available for exactly this reason.
Note that we have done something pretty magical here: we have turned this button into a hypermedia control. It is no
longer necessary that this button be placed within a larger form tag in order to trigger an HTTP request: it is a
stand-alone, and fully featured hypermedia control on its own. This is at the heart of htmx, allowing any element to become
a hypermedia control and fully participate in a Hypermedia-Driven Application.
We should also note that, unlike with the hx-boost examples above, this solution will not degrade gracefully. To make
this solution degrade gracefully, we would need to wrap the button in a form element and handle a POST on the server
side as well.
In the interest of keeping our application simple, we are going to omit that more elaborate solution.
Updating The Server-Side Code
We have updated the client-side code (if HTML can be considered code) so it now issues a DELETE request to the appropriate
URL, but we still have some work to do. Since we updated both the route and the HTTP method we are using, we are going to
need to update the server-side implementation as well to handle this new HTTP request.
@app.route("/contacts/<contact_id>/delete", methods=["POST"])
def contacts_delete(contact_id=0):
    contact = Contact.find(contact_id)
    contact.delete()
    flash("Deleted Contact!")
    return redirect("/contacts")
We’ll need to make two changes to our handler: update the route, and update the HTTP method we are using to delete contacts.
@app.route("/contacts/<contact_id>", methods=["DELETE"]) (1)
def contacts_delete(contact_id=0):
    contact = Contact.find(contact_id)
    contact.delete()
    flash("Deleted Contact!")
return redirect("/contacts")- An updated path and method for the handler.
Pretty simple, and much cleaner.
A response code gotcha
Unfortunately, there is a problem with our updated handler: by default, in Flask the redirect() method responds with
a 302 Found HTTP Response Code.
According to the Mozilla Developer Network (MDN) web docs on the 302 Found
response, this means that the HTTP method of the request will be unchanged when the redirected HTTP request is issued.
We are now issuing a DELETE request with htmx and then being redirected to the /contacts path by flask. According to this
logic, that would mean that the redirected HTTP request would still be a DELETE method. This means that, as it stands,
the browser will issue a DELETE request to /contacts.
This is definitely not what we want: we would like the HTTP redirect to issue a GET request, slightly modifying the
Post/Redirect/Get behavior we discussed earlier to be a Delete/Redirect/Get.
Fortunately, there is a different response code, 303 See Other,
that does what we want: when a browser receives a 303 See Other redirect response, it will issue a GET to the new
location.
So we want to update our code to use the 303 response code in the controller.
Thankfully, this is very easy: there is a second parameter to redirect() that takes the numeric response code you wish
to send.
303 redirect response@app.route("/contacts/<contact_id>", methods=["DELETE"])
def contacts_delete(contact_id=0):
contact = Contact.find(contact_id)
contact.delete()
flash("Deleted Contact!")
return redirect("/contacts", 303) (1)- The response code is now a 303.
Now, when you want to remove a given contact, you can simply issue a DELETE to the same URL as you used to access the
contact in the first place.
This is a natural HTTP-based approach to deleting a resource.
Targeting The Right Element
We aren’t quite finished with our updated delete button. Recall that, by default, htmx “targets” the element that triggers a request, and will place the HTML returned by the server inside that element. Right now, the “Delete Contact” button is targeting itself.
That means that, since the redirect to the /contacts URL is going to re-render the entire contact list, we will end up
with that contact list placed inside the “Delete Contact” button.
Mis-targeting like this comes up from time to time when you are working with htmx and can lead to some pretty funny situations.
The fix for this is easy: add an explicit target to the button, and target the body element with the response:
  <button hx-delete="/contacts/{{ contact.id }}"
          hx-target="body"> (1)
    Delete Contact
</button>- An explicit target added to the button.
Now our button behaves as expected: clicking on the button will issue an HTTP DELETE to the server against the URL for
the current contact, delete the contact and redirect back to the contact list page, with a nice flash message.
Is everything working smoothly now?
Updating The Location Bar URL Properly
Well, almost.
If you click on the button you will notice that, despite the redirect, the URL in the location bar is
not correct. It still points to /contacts/{{ contact.id }}. That’s because we haven’t told htmx to update
the URL: it just issues the DELETE request and then updates the DOM with the response.
As we mentioned, boosting via hx-boost will naturally update the location bar for you, mimicking normal anchors and forms, but in
this case we are building a custom button hypermedia control to issue a DELETE. We
need to let htmx know that we want the resulting URL from this request “pushed” into the location bar.
We can achieve this by adding the hx-push-url attribute with the value true to our button:
  <button hx-delete="/contacts/{{ contact.id }}"
          hx-push-url="true" (1)
          hx-target="body">
    Delete Contact
</button>- We tell htmx to push the redirected URL up into the location bar.
Now we are done.
We have a button that, all by itself, is able to issue a properly formatted HTTP DELETE request to
the correct URL, and the UI and location bar are all updated correctly. This was accomplished with three declarative
attributes placed directly on the button: hx-delete, hx-target and hx-push-url.
This required more work than the hx-boost change, but the explicit code makes it easy to see what the button is doing
as a custom hypermedia control. The resulting solution feels clean; it takes advantage of
the built-in features of the web as a hypermedia system without any URL hacks.
One More Thing…
There is one additional “bonus” feature we can add to our “Delete Contact” button: a confirmation dialog. Deleting a contact is a destructive operation and as it stands right now, if the user inadvertently clicked the “Delete Contact” button, the application would just delete that contact. Too bad, so sad for the user.
Fortunately htmx has an easy mechanism for adding a confirmation message on destructive operations like this: the
hx-confirm attribute. You can place this attribute on an element, with a message as its value, and the JavaScript
method confirm() will be called before a request is issued, which will show a simple confirmation dialog to the user
asking them to confirm the action. Very easy and a great way to prevent accidents.
Here is how we would add confirmation of the contact delete operation:
  <button hx-delete="/contacts/{{ contact.id }}"
          hx-push-url="true"
          hx-confirm="Are you sure you want to delete this contact?" (1)
          hx-target="body">
    Delete Contact
</button>- This message will be shown to the user, asking them to confirm the delete.
Now, when someone clicks on the “Delete Contact” button, they will be presented with a prompt that asks “Are you sure you want to delete this contact?” and they will have an opportunity to cancel if they clicked the button in error. Very nice.
With this final change we now have a pretty solid “delete contact” mechanism: we are using the correct RESTful routes and HTTP Methods, we are confirming the deletion, and we have removed a lot of the cruft that normal HTML imposes on us, all while using declarative attributes in our HTML and staying firmly within the normal hypermedia model of the web.
Progressive Enhancement?
As we noted earlier about this solution: it is not a progressive enhancement to our web application. If someone has disabled JavaScript then this “Delete Contact” button will no longer work. We would need to do additional work to keep the older form-based mechanism working in a JavaScript-disabled environment.
Progressive Enhancement can be a hot-button topic in web development, with lots of passionate opinions and perspectives. Like nearly all JavaScript libraries, htmx makes it possible to create applications that do not function in the absence of JavaScript. Retaining support for non-JavaScript clients requires additional work and complexity in your application. It is important to determine exactly how important supporting non-JavaScript clients is before you begin using htmx, or any other JavaScript framework, for improving your web applications.
Next Steps: Validating Contact Emails
Let’s move on to another improvement in our application. A big part of any web app is validating the data that is submitted to the server: ensuring emails are correctly formatted and unique, numeric values are valid, dates are acceptable, and so forth.
Currently, our application has a small amount of validation that is done entirely server-side and that displays an error message when an error is detected.
We are not going to go into the details of how validation works in the model objects, but recall what the code for updating a contact looks like from Chapter 3:
def contacts_edit_post(contact_id=0):
    c = Contact.find(contact_id)
    c.update(request.form['first_name'], request.form['last_name'], request.form['phone'], request.form['email'])
    if c.save(): (1)
        flash("Updated Contact!")
        return redirect("/contacts/" + str(contact_id))
    else:
return render_template("edit.html", contact=c) (2)- We attempt to save the contact.
- If the save does not succeed we re-render the form to display error messages.
So we attempt to save the contact, and, if the save() method returns true, we redirect to the contact’s detail page.
If the save() method does not return true, that indicates that there was a validation error; instead of redirecting,
we re-render the HTML for editing the contact. This gives the user a chance to correct the errors, which are displayed
alongside the inputs.
Let’s take a look at the HTML for the email input:
<p>
    <label for="email">Email</label>
    <input name="email" id="email" type="text" placeholder="Email" value="{{ contact.email }}">
    <span class="error">{{ contact.errors['email'] }}</span>(1)
</p>- Display any errors associated with the email field
We have a label for the input, an input of type text and then a bit of HTML to display any error messages associated
with the email. When the template is rendered on the server, if there are errors associated with the contact’s email, they will
be displayed in this span, which will be highlighted red.
The error message shown when a user attempts to save a contact with a duplicate email is "Email Must Be Unique":
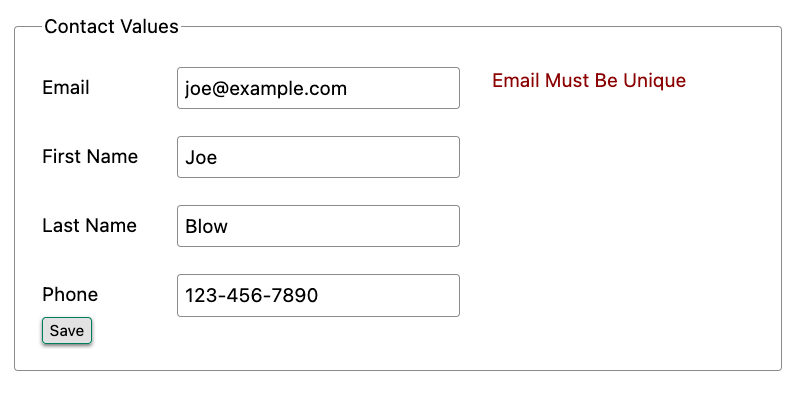
All of this is done using plain HTML and using Web 1.0 techniques, and it works well.
However, as the application currently stands, there are two annoyances.
- First, there is no email format validation: you can enter whatever characters you’d like as an email and, as long as they are unique, the system will allow it.
- Second, we only check the email’s uniqueness when all the data is submitted: if a user has entered a duplicate email, they will not find out until they have filled in all the fields. This could be quite annoying if the user was accidentally reentering a contact and had to put all the contact information in before being made aware of this fact.
Updating Our Input Type
For the first issue, we have a pure HTML mechanism for improving our application: HTML 5 supports inputs of
type email. All we need to do is switch our input from type text to type email, and the browser will
enforce that the value entered properly matches the email format:
email<p>
<label for="email">Email</label>
<input name="email" id="email" type="email" placeholder="Email" value="{{ contact.email }}"> (1)
<span class="error">{{ contact.errors['email'] }}</span>
</p>-
A change of the
typeattribute toemailensures that values entered are valid emails.
With this change, when the user enters a value that isn’t a valid email, the browser will display an error message asking for a properly formed email in that field.
So a simple single-attribute change done in pure HTML improves our validation and addresses the first problem we noted.
Inline Validation
While we have improved our validation experience a bit, the user must still submit the form to get any feedback on duplicate emails. We can next use htmx to improve this user experience.
It would be better if the user were able to see a duplicate email error immediately after entering the email value. It
turns out that inputs fire a change event and, in fact, the change event is the default trigger for inputs in htmx.
So, putting this feature to work, we can implement the following behavior: when the user enters an email, immediately
issue a request to the server and validate that email, and render an error message if necessary.
Recall the current HTML for our email input:
<p>
    <label for="email">Email</label>
    <input name="email" id="email" type="email" placeholder="Email" value="{{ contact.email }}"> (1)
    <span class="error">{{ contact.errors['email'] }}</span> (2)
</p>- This is the input that we want to have drive an HTTP request to validate the email.
- This is the span we want to put the error message, if any, into.
So we want to add an hx-get attribute to this input. This will cause the input to issue an HTTP GET request to a
given URL to validate the email. We then want to target the error span following the input with any error message
returned from the server.
Let’s make those changes to our HTML:
<p>
    <label for="email">Email</label>
    <input name="email" id="email" type="email"
           hx-get="/contacts/{{ contact.id }}/email" (1)
           hx-target="next .error" (2)
           placeholder="Email" value="{{ contact.email }}"> (1)
    <span class="error">{{ contact.errors['email'] }}</span>
</p>-
Issue an HTTP
GETto theemailendpoint for the contact. -
Target the next element with the class
erroron it.
Note that in the hx-target attribute we are using a relative positional selector, next. This is a feature of htmx and
an extension to normal CSS. Htmx supports prefixes that will find targets relative to the current element.
By using relative positional expressions we can avoid adding explicit ids to elements and take advantage of the local structure of HTML.
So, in our example with added hx-get and hx-target attributes, whenever someone changes the value of the input (remember, change is the
default trigger for inputs in htmx) an HTTP GET request will be issued to the given URL. If there are any errors, they will be loaded into the error span.
Validating Emails Server-Side
Next, let’s look at the server-side implementation. We are going to add another endpoint, similar to our edit
endpoint in some ways: it is going to look up the contact based on the ID encoded in the URL. In this case, however,
we only want to update the email of the contact, and we obviously don’t want to save it! Instead, we will call the
validate() method on it.
That method will validate the email is unique and so forth. At that point we can return any errors associated with the email directly, or the empty string if none exist.
@app.route("/contacts/<contact_id>/email", methods=["GET"])
def contacts_email_get(contact_id=0):
    c = Contact.find(contact_id) (1)
    c.email = request.args.get('email') (2)
    c.validate() (3)
return c.errors.get('email') or "" (4)- Look up the contact by id.
-
Update its email (note that since this is a
GET, we use theargsproperty rather than theformproperty). - Validate the contact.
- Return a string, either the errors associated with the email field or, if there are none, the empty string.
With this small bit of server-side code in place, we now have the following user experience: when a user enters an email and tabs to the next input field, they are immediately notified if the email is already taken.
Note that the email validation is still done when the entire contact is submitted for an update, so there is no danger of allowing duplicate email contacts to slip through: we have simply made it possible for users to catch this situation earlier by use of htmx.
It is also worth noting that this particular email validation must be done on the server side: you cannot determine that an email is unique across all contacts unless you have access to the data store of record. This is another simplifying aspect of Hypermedia-Driven Applications: since validations are done server-side, you have access to all the data you might need to do any sort of validation you’d like.
Here again we want to stress that this interaction is done entirely within the hypermedia model: we are using declarative attributes and exchanging hypermedia with the server in a manner very similar to how links or forms work. But we have managed to improve our user experience dramatically.
Taking The User Experience Further
Despite the fact that we haven’t added a lot of code here, we have a fairly sophisticated user interface, at least when compared with plain HTML-based applications. However, if you have used more advanced Single Page Applications you have probably seen the pattern where an email field (or a similar sort of input) is validated as you type.
This seems like the sort of interactivity that is only possible with a sophisticated, complex JavaScript framework, right?
Well, no.
It turns out that you can implement this functionality in htmx, using pure HTML attributes.
In fact, all we need to do is to change our trigger. Currently, we are using the default trigger for inputs, which is the
change event. To validate as the user types, we would want to capture the keyup event as well:
keyup events<p>
<label for="email">Email</label>
<input name="email" id="email" type="email"
hx-get="/contacts/{{ contact.id }}/email"
hx-target="next .error"
hx-trigger="change, keyup" (1)
placeholder="Email" value="{{ contact.email }}">
<span class="error">{{ contact.errors['email'] }}</span>
</p>-
An explicit
keyuptrigger has been added along withchange.
With this tiny change, every time a user types a character we will issue a request and validate the email. Simple.
Debouncing Our Validation Requests
Simple, yes, but probably not what we want: issuing a new request on every key up event would be very wasteful and could potentially overwhelm your server. What we want instead is only issue the request if the user has paused for a small amount of time. This is called “debouncing” the input, where requests are delayed until things have “settled down”.
Htmx supports a delay modifier for triggers that allows you to debounce a request by adding a delay before the request
is sent. If another event of the same kind appears within that interval, htmx will not issue the request and will reset
the timer.
This turns out to be exactly what we want for our email input: if the user is busy typing in an email we won’t interrupt them, but as soon as they pause or leave the field, we’ll issue a request.
Let’s add a delay of 200 milliseconds to the keyup trigger, which is long enough to detect that the user has stopped
typing.:
keyup event<p>
<label for="email">Email</label>
<input name="email" id="email" type="email"
hx-get="/contacts/{{ contact.id }}/email"
hx-target="next .error"
hx-trigger="change, keyup delay:200ms" (1)
placeholder="Email" value="{{ contact.email }}">
<span class="error">{{ contact.errors['email'] }}</span>
</p>-
We debounce the
keyupevent by adding adelaymodifier.
Now we no longer issue a stream of validation requests as the user types. Instead, we wait until the user pauses for a bit and then issue the request. Much better for our server, and still a great user experience.
Ignoring Non-Mutating Keys
There is one last issue we should address with the keyup event: as it stands we will issue a request no matter which keys are pressed, even if they are keys that have no effect on the value of the input, such as arrow keys. It would be better if there were a way to only issue a request if the input value has changed.
And it turns out that htmx has support for that exact pattern, by using the changed modifier for events. (Not to be
confused with the change event triggered by the DOM on input elements.)
By adding changed to our keyup trigger, the input will not issue validation requests unless the keyup event actually
updates the inputs value:
<p>
    <label for="email">Email</label>
    <input name="email" id="email" type="email"
           hx-get="/contacts/{{ contact.id }}/email"
           hx-target="next .error"
           hx-trigger="change, keyup delay:200ms changed" (1)
           placeholder="Email" value="{{ contact.email }}">
    <span class="error">{{ contact.errors['email'] }}</span>
</p>- We do away with pointless requests by only issuing them when the input’s value has actually changed.
That’s some pretty good-looking and powerful HTML, providing an experience that most developers would think requires a complicated client-side solution.
With a total of three attributes and a simple new server-side endpoint, we have added a fairly sophisticated user experience to our web application. Even better, any email validation rules we add on the server side will automatically just work using this model: because we are using hypermedia as our communication mechanism there is no need to keep a client-side and server-side model in sync with one another.
A great demonstration of the power of the hypermedia architecture!
Another Application Improvement: Paging
Let’s move on from the contact editing page for a bit and improve the root page of the application, found
at the /contacts path and rendering the index.html template.
Currently, Contact.app does not support paging: if there are 10,000 contacts in the database we will show all 10,000 contacts on the root page. Showing so much data can bog a browser (and a server) down, so most web applications adopt a concept of “paging” to deal with data sets this large, where only one “page” of a smaller number of items is shown, with the ability to navigate around the pages in the data set.
Let’s fix our application so that we only show ten contacts at a time with a “Next” and “Previous” link if there are more than 10 contacts in the contact database.
The first change we will make is to add a simple paging widget to our index.html template.
We will conditionally include two links:
- If we are beyond the “first” page, we will include a link to the previous page
- If there are ten contacts in the current result set, we will include a link to the next page
This isn’t a perfect paging widget: ideally we’d show the number of pages and offer the ability to do more specific page navigation, and there is the possibility that the next page might have 0 results in it since we aren’t checking the total results count, but it will do for now for our simple application.
Let’s look at the jinja template code for this in index.html.
<div>
    <span style="float: right"> (1)
        {% if page > 1 %}
          <a href="/contacts?page={{ page - 1 }}">Previous</a> (2)
        {% endif %}
        {% if contacts|length == 10 %}
          <a href="/contacts?page={{ page + 1 }}">Next</a> (3)
        {% endif %}
    </span>
</div>- Include a new div under the table to hold our navigation links.
- If we are beyond page 1, include an anchor tag with the page decremented by one.
- If there are 10 contacts in the current page, include an anchor tag linking to the next page by incrementing it by one.
Note that here we are using a special jinja filter syntax contacts|length to compute the length of the contacts
list. The details of this filter syntax is beyond the scope of this book, but in this case you can think of it as
invoking the contacts.length property and then comparing that with 10.
Now that we have these links in place, let’s address the server-side implementation of paging.
We are using the page request parameter to encode the paging state of the UI. So, in our handler, we need to look for
that page parameter and pass that through to our model, as an integer, so the model knows which page of contacts to return:
@app.route("/contacts")
def contacts():
    search = request.args.get("q")
    page = int(request.args.get("page", 1)) (1)
    if search is not None:
        contacts_set = Contact.search(search)
    else:
        contacts_set = Contact.all(page) (2)
return render_template("index.html", contacts=contacts_set, page=page)- Resolve the page parameter, defaulting to page 1 if no page is passed in.
- Pass the page through to the model when loading all contacts so it knows which page of 10 contacts to return.
This is fairly straightforward: we just need to get another parameter, like the q parameter we passed in for
searching contacts earlier, convert it to an integer and then pass it through to the Contact model, so it
knows which page to return.
And, with that small change, we are done: we now have a very basic paging mechanism for our web application.
And, believe it or not, it is already using AJAX, thanks to our use of hx-boost in the application. Easy!
Click To Load
This paging mechanism is fine for a basic web application, and it is used extensively on the internet. But it has some drawbacks associated with it: every time you click the “Next” or “Previous” buttons you get a whole new page of contacts and lose any context you had on the previous page.
Sometimes a more advanced paging UI pattern might be better. Maybe, rather than loading in a new page of elements and replacing the current elements, it would be nicer to append the next page of elements inline, after the current elements.
This is the common “click to load” UX pattern, found in more advanced web applications.
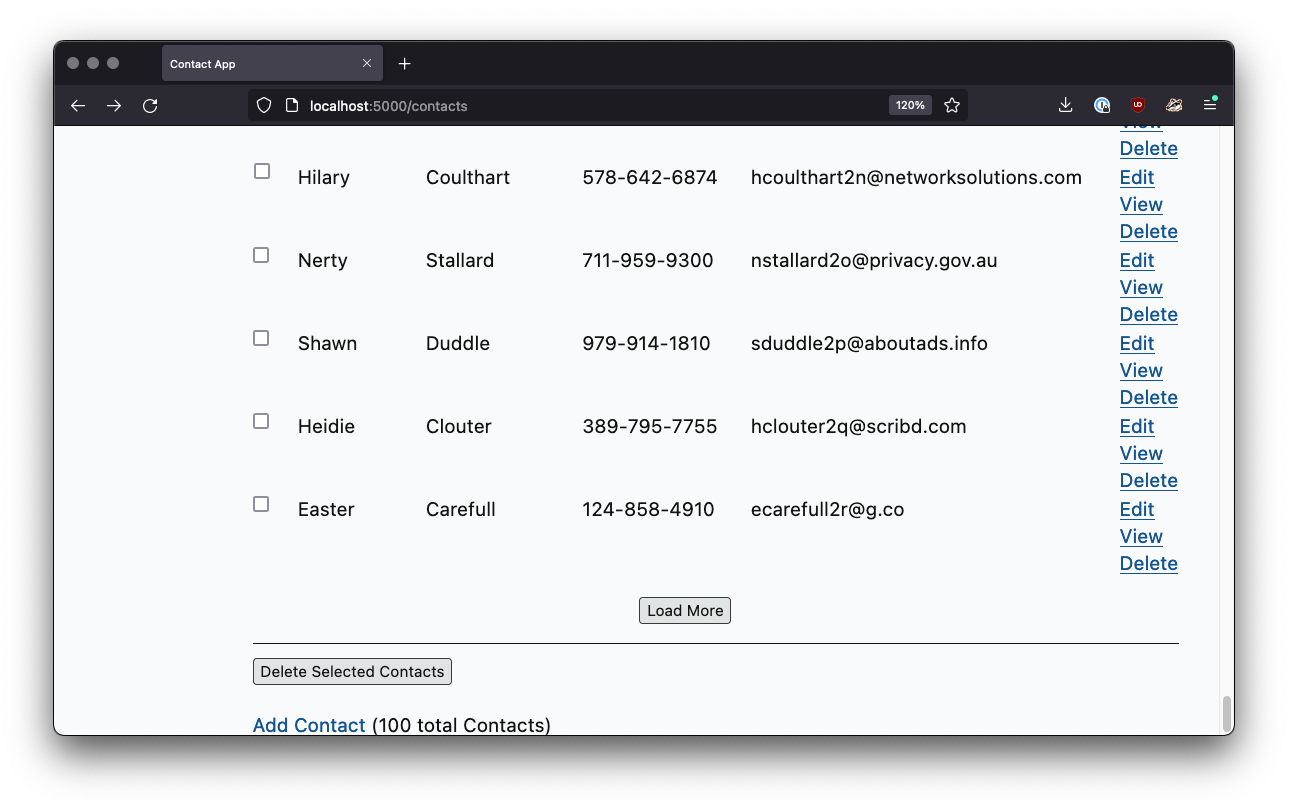
Here, you have a button that you can click, and it will load the next set of contacts directly into the page, rather than “paging” to the next page. This allows you to keep the current contacts “in context” visually on the page, but still progress through them as you would in a normal, paged user interface.
Let’s see how we can implement this UX pattern in htmx.
It’s actually surprisingly simple: we can just take the existing “Next” link and repurpose it a bit using nothing but a few htmx attributes!
We want to have a button that, when clicked, appends the rows from the next page of contacts to the current, existing table, rather than re-rendering the whole table. This can be achieved by adding a new row to our table that has just such a button in it:
        <tbody>
        {% for contact in contacts %}
            <tr>
                <td>{{ contact.first }}</td>
                <td>{{ contact.last }}</td>
                <td>{{ contact.phone }}</td>
                <td>{{ contact.email }}</td>
                <td><a href="/contacts/{{ contact.id }}/edit">Edit</a> <a href="/contacts/{{ contact.id }}">View</a></td>
            </tr>
        {% endfor %}
        {% if contacts|length == 10 %} (1)
            <tr>
                <td colspan="5" style="text-align: center">
                    <button hx-target="closest tr" (2)
                            hx-swap="outerHTML"   (3)
                            hx-select="tbody > tr" (4)
                            hx-get="/contacts?page={{ page + 1 }}">
                      Load More
                    </button>
                </td>
            </tr>
        {% endif %}
</tbody>- Only show “Load More” if there are 10 contact results in the current page.
- Target the closest enclosing row.
- Replace the entire row with the response from the server.
- Select out the table rows from the response.
Let’s go through each attribute in detail here.
First, we are using hx-target to target the “closest” tr element, that is, the closest parent table row.
Second, we want to replace this entire row with whatever content comes back from the server.
Third, we want to yank out only the tr elements in the response. We are replacing this tr element with a new set
of tr elements, which will have additional contact information in them, as well as, if necessary, a new “Load More”
button that points to the next next page. To do this, we use a CSS selector tbody > tr to ensure we only pull
out the rows in the body of the table in the response. This avoids including rows in the table header, for example.
Finally, we issue an HTTP GET to the url that will serve the next page of contacts, which looks just like the “Next”
link from above.
Somewhat surprisingly, no server-side changes are necessary for this new functionality. This is because of the flexibility that htmx gives you with respect to how it processes server responses.
So, four attributes, and we now have a sophisticated “Click To Load” UX, via htmx.
Infinite Scroll
Another common pattern for dealing with large sets of things is known as the “Infinite Scroll” pattern. In this pattern, as the last item of a list or table of elements is scrolled into view, more elements are loaded and appended to the list or table.
Now, this behavior makes more sense in situations where a user is exploring a category or series of social media posts, rather than in the context of a contact application. However, for completeness, and to just show what you can do with htmx, we will implement this pattern as well.
It turns out that we can repurpose the “Click To Load” code to implement this new pattern quite easily: if you think about it for a moment, infinite scroll is really just the “Click To Load” logic, but rather than loading when a click event occurs, we want to load when an element is “revealed” in the view portal of the browser.
As luck would have it, htmx offers a synthetic (non-standard) DOM event, revealed that can be used in tandem
with the hx-trigger attribute, to trigger a request when, well, when an element is revealed.
So let’s convert our button to a span and take advantage of this event:
{% if contacts|length == 10 %} (1)
    <tr>
        <td colspan="5" style="text-align: center">
            <span hx-target="closest tr" (1)
                  hx-trigger="revealed" (2)
                  hx-swap="outerHTML"
                  hx-select="tbody > tr"
                  hx-get="/contacts?page={{ page + 1 }}">Loading More...</span>
        </td>
    </tr>
{% endif %}- We have converted our element from a button to a span, since the user will not be clicking on it.
- We trigger the request when the element is revealed, that is when it comes into view in the portal.
All we needed to do to convert from “Click to Load” to “Infinite Scroll” was to update our element to be
a span and then add the revealed event trigger.
The fact that switching to infinite scroll was so easy shows how well htmx generalizes HTML: just a few attributes allow us to dramatically expand what we can achieve in the hypermedia.
And, again, we are doing all this while taking advantage of the RESTful model of the web. Despite all this new behavior, we are still exchanging hypermedia with the server, with no JSON API response to be seen.
As the web was designed.